
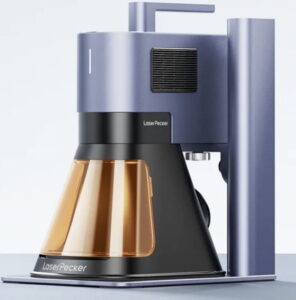
LaserPecker 5
With a name like LaserPecker, you know it has to be great. And with a 5th generation LaserPecker 5, ($2899) it really has to be great. The LP5 is a combination 20 watt 450 nanometer (nm) blue diode laser and a 20 watt 1064 nm IR fiber laser. This allows for engraving on a large variety of materials to include wood, paper, leather, metals and plastics and a whole lot of other items.
It currently only has one other straight up competitor with the inclusion of the 20 watt fiber laser. I was super excited to test this as my other combo lasers are 10 watt diode and 2 watt 1064nm IR lasers. I do have a dedicated 30 watt fiber laser and I’m very curious to see how it compares to that.
Additionally, I have tested the LP4 and it kind of fell into the “Fantastic Hardware, Not So Fantastic Software” category as far as I was concerned. So I’ll be focusing a bit more on LaserPecker Design Space software. And I’ll be looking at Lightburn integration for the LaserPecker 5.
Disclaimer
LaserPecker provided me an LP5 and Safety Enclosure ($559) to review. They are not paying me and they have not requested any editorial review or control over this blog.
LaserPecker 5 & Enclosure
The quick run down on the LP5 and enclosure:
- 20 watt 450 nm diode laser
- 20 watt 1064 nm IR laser
- 120mm x 160mm working area
- Highly Portable
- 10,000 mm/sec speed
- Multiple Connection methods
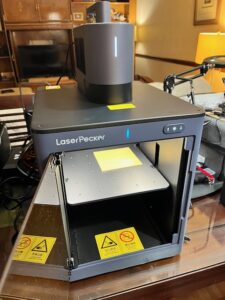
LaserPecker 5 & Enclosure
Paired with the Enclosure it is not only powerful but much safer. Additionally, I love the fact that the enclosure has front and rear access doors that make positioning easy.
The working surface plate runs efficiently and quietly on lead screws. And the interior cabinet is very well lit.
One cautionary note is that when the LP5 is secured on the enclosure that you should never try to lift and move the unit from the LP5 handle. Pick up the cabinet.
I have another cautionary note about the cabinet. The LP5 is positioned on top of the cabinet but secured from the inside with 2 thumb screws. I STRONGLY recommend having the lens cover on because one of those thumbscrews is really close to the optical lens.
So anyway, you just need to take some caution when assembling and I’d hope that after buying one of these you would give it all the love and maintenance it needs so you can get busy to start paying for it.
Now, when you remove the LP5 from the enclosure there is nowhere to stow those thumbscrews. The holes in the working area plate are smaller. I made the mistake of sliding my enclosure with the screws just laying loose on the plate. One of them disappeared into the deepest darkest part behind the walls. It literally took me about 30 minutes to get that screw out of there. I recommended to LaserPecker Support to simply add two holes on the end of the plate and tap them to accommodate the size of the thumbscrews.
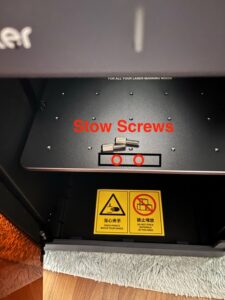
Recommendation to stow laser head attaching thumbscrews
Anyway, don’t just let those screws roll around inside the unit like I did. Finally, when using the safety enclosure the LP5 is a CLASS 1 Laser.
Lightburn
I think most of us who have been in the laser game are Lightburn users. I know I am. The LP5 comes with an .lbdev file which sets the laser up as a GRBL device.

GRBL = LP5
That means that while you can select the 1064 nm fiber lens in Lightburn you don’t have things like frequency control available to you. That’s cool for making business cards. But not real cool for other fiber operations where you want to colorize or simply change the frequency for darker or lighter results. Lightburn technically works with the fiber laser but for full control of that fiber laser you are going to want to use LaserPecker Design Space.
According to LP documentation, Lightburn does not give real time preview (outlines), 3D grayscale embossing, or rotary use. For those items you must use LaserPecker Design Space.
LaserPecker Design Space Software (LDS)
Here is my theory on laser software. Lightburn is best but having a shipping laser with FREE software can’t be beat. Also that free software generally starts off being bad and then improves greatly over time with a strong community. The last time I used LDS I recall it being fairly awful. I do find that I’m able to navigate it much better although it does still cause me to scratch my head from time to time. Outlines truly baffled me at first. I knew the LP5 must be capable of outlining your image but it is an experimental feature that apparently only works with vector images. Here’s a hot take on outlined images.
[kad_youtube url=”https://youtu.be/68iGYV8soSs?si=e5GpchDSBhND94I4″ ]
Hopefully this will be one of those items that is pushed and perfected.
I’ve found LDS to be somewhat more intuitive however, it still has some work to be done.
Laser Examples
Besides a test burn on a piece of wood, the first thing I laser-ed using the fiber laser was a 9mm magazine. Worked perfectly and again I have to state you should use LaserPecker Design Space Software for fiber engraving.
[kad_youtube url=”https://www.youtube.com/watch?v=DPFwbS5arKQ” ]
Turned out great. Then I decided to make a business card on anodized aluminum bland card stock. It also turned out great.
[kad_youtube url=”https://youtu.be/PqdEbCl4BXI” ]
Embossing
Even though I have had lasers for years and even a dedicated fiber laser I have never attempted to do much embossing on brass blanks. I’m still working on it to include the post processing and learning how to make depth mapped images.
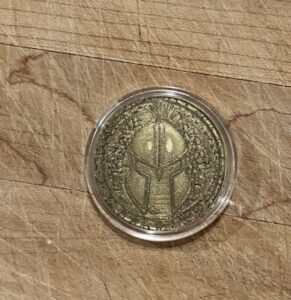
Embossing Brass Blanks
It takes quite a bit of time to emboss. The 3 items I have made were about 3 hours each. Also, I found that getting them CENTERED took some doing. I figured I’d go online and find a brass coin jig but oddly enough I never found one. So I made my own.
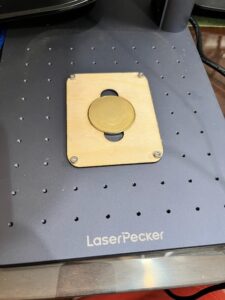
Brass Coin Jig
Here’s my take on using the LP5 for embossing, if your bread and butter side hustle money comes from challenge coins then you need a 100 watt or larger fiber laser. If you make a few coins a year for golf buddies or the kids then the LaserPecker 5 is all kinds of enough for making those coins.
LaserPecker 5 Recommendations
- Keep up the good work on tweaking LaserPecker Design Space software. It is so much better than the last time I used it.
- As mentioned earlier provide some method of stowing the thumb screws that secure the LP5 laser head to the safety enclosure.
- If possible make a galvo lbset file for Lightburn.
- Keep working on the outline feature. A projected outline is far better than a box or centering point.
Final Thoughts
Dual lasers are becoming a thing. And there are only a couple of places that offer a 20 watt IR laser. Most are still in the 2 watt IR range. You can do an awful lot with a 20 watt fiber laser. But remember that if you are only a Lightburn user that you are not going to have full control over the IR laser and you’ll pretty much have to use LaserPecker Design Space software.
Having previously reviewed the LP4 and pretty much not liking it I have to say that the LP5 is an improvement especially as it relates to Design Space software. I still find it quirky a little bit changing things from a Line to a Fill or Offset Fill are super simple in Lightburn but those operations are not nearly as intuitive in LDS. Everything has a learning curve and after a few weeks with the LP5 I think I’m getting much more comfortable with using LDS.
THE LASERPECKER 5 IS A HUGE IMPROVEMENT OVER THE LASERPECKER 4 NOT ONLY IN HARDWARE BUT ESPECIALLY IN SOFTWARE DEVELOPMENT. HIGHLY RECOMMENDED!