
MiniRack Build Out And Review
Seems like in the last year or two home networking folks have started building up MiniRack Home Lab servers. A typical network server rack is 19″ and the minirack form factor is 10″.
My build is inspired by Jeff Geerling. Jeff is a Tech Guy who specializes in all things Raspberry Pi. Anyone who owns a Pi probably knows about him. Essentially, my build will consist of 3 Raspberry Pi computers and a JetKVM.
- Raspberry Pi 4 with POE+. – An MMDVM board is used as a gateway for DMR Ham Radio.
- Raspberry Pi 5 with GeekPi POE+ and 256GB NVME Hat. Additionally, a HiFiBerry DAC8x Digital to Analog converter for streaming audio. Lyrion Music server and Squeezelite and deployed.
- Raspberry Pi 5 with the same Geekpi POE+ and this NVME houses a 4TB NVME drive with Samba. Also, it has a mini RTL-SDR for running OP25 which is a P25 Phase 1 and Phase 2 decoder. I use it to track two trunking communications systems. (Police Scanner)
- JetKVM – used to control the Pi with the 4TB drive. Lastly, KVM stands for Keyboard, Video, and Mouse and is similar to IPMI accessibility.
Before We Begin And Gotchas

Minirack Built!
If you intend to build in a JetKVM as I have in the picture you will need a couple things.
To mount the JetKVM you have to remove the two cover plate screws on top of the device. All the 3D print files are here.
You need to purchase 2 – 2x16mm machine screws for mounting the JetKVM in the 3D printed module.
Also the HDMI cable provided is an HDMI mini to HDMI. The Pi 4 and 5 versions have Micro HDMI connectors. I bought this adapter to mitigate this problem.
Gotcha
The Mini HDMI to HDMI cable that came with the JetKVM doesn’t work. It apparently wasn’t tested.
Also the GigaPlus GP-S25-0802P router doesn’t quite fit in the rack with the included rack ears. I took a drill bit and pulled all 4 holes closer to the router to encapsulate the mounting holes. It was a pain but it worked fine.
Regarding those mounting holes there is not a bag of mounting screws that comes with the case. You need to buy them separately.
My largest 3D printer is a Prusa Mk 3 and I could not fit the mounting plate for the individual 4 components on my print bed. Fortunately I have a good friend who has a larger 3D printer and he printed it up for me.
Moral to my story. Buy a couple of screws and whatever cable or adapter you’ll need if connecting to a Pi. Nothing worse that getting a cool device and not being able to hook it up for another day or so. Also make sure you can 3D print everything you need as mentioned above.
Build Of Materials For MiniRack
- GeekPi 4U Server Cabinet – $99
- GeekPi T0 Screws and Washers – $5.99
- Parts for 3D printing – Open Source
- JetKVM – $69
- Pi 5 (2 each 8GB) – $80 each
- Pi 4 (1 each) – $35
- MMDVM Hat for DMR Ham Radio – $36 (much cheaper from Aliexpress)
- GeekPi POE+ NVME Hat for Pi 5 $79.99 (2 each)
- Pi 4 Official POE+ Hat – $20
- Samsung 4TB NVME Drive – $249
- HiFiBerry DAC8x – $64.90
- USB Sound Card – $9.24
- RTL-SDR NESDR Nano 3 – $41
- POE+ CAT 6 cables – $22.48
- Micro HDMI to HDMI Adapter – $8.99
- GMKTec G3 Mini PC – $139
Build Positions
- JetKVM – Connected to GMKTec G3 with Ubuntu Linux
- Pi 4 – POE+ Hat MMDVM DRM Radio Board with WPSD OS (32GB SD)
- Pi 5 with GeekPi POE+ Hat and NVME board. DAC8x (256GB NVME)
- Pi 5 with GeekPi POE+ Hat and NVME board (4TB NVME) and SAMBA
Here’s the build overview. I forgot to mention on the last Pi 5 that it also had a POE+ Hat and a 4TB NVME drive for backup storage.
[kad_youtube url=”https://youtu.be/p8cHOWDNj7E” ]
Pretty cool, huh?
JetKVM
The JetKVM is a Keyboard, Video and Mouse. You can access the device it is connected to from anywhere and manage it, even at the BIOS level. It is similar to IPMI used by several computer manufacturers. Here’s what the management screen looks like.
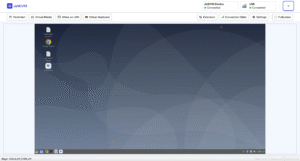
JetKVM Management
I won’t get too deep in the weeds here but this gives you a small idea of what the KVM can do. The JetKVM is a must have piece of homelab equipment. Also, at $69 it is very affordable.
DMR Radio
By adding an MMDVM hat to the Pi 4 I can talk to ham radio users all over the world. Here is a quick overview of how that works.
[kad_youtube url=”https://youtu.be/JReu9dFRhlA?si=d666WZJrE65O2eKg” ]
Final Thoughts
I’m happy with my minirack project and it excels in communications. Having an RTL-SDR device allows for listening to all bands of radio and of course it acts as a digital decoder for Police, Fire, and EMS listening.
My DMR Pi is used in conjunction with a Retevis RT3S DMR radio. The best part about the RT3S is that you can run 3rd party firmware and I have GD-77 installed. By the way I am KN4FMV out in DMR land.
I’m blown away with the JetKVM even though I probably won’t use it that much. It’s like having insurance though.
Regarding the JetKVM Cloud……..I’m not utilizing it. I have my own VPN server on my Firewall and I can get to my network from anywhere via WireGuard.
Lastly, with a 4TB NVME drive in one Pi I can store all my CNC and Laser Files for redundancy.
The minirack project was a blast and kudos to Jeff Geerling for making the road ahead smooth.
Thank you for your review, it is very helpful to me.