IQ Audio DAC+ Rotary Encoder On Raspberry Pi B+

This is a quick tutorial on how to add a rotary encoder to a Raspberry Pi with an IQAudio DAC+. There were bits and pieces of this on the web but nobody has a Barney style tutorial and that’s what this is.
The assumption is that you have a Raspberry Pi and IQAudioDac that plays music. And now you want to control the volume manually.
And I’m making the assumption that when you got your IQAudio DAC that you soldered on the header pins they sent with it. You’ll need to do that. Follow the directions on page 30 of their user guide.
First get the rotary encoder and some female to female jumpers from Adafruit.
HARDWARE CONNECTIONS:
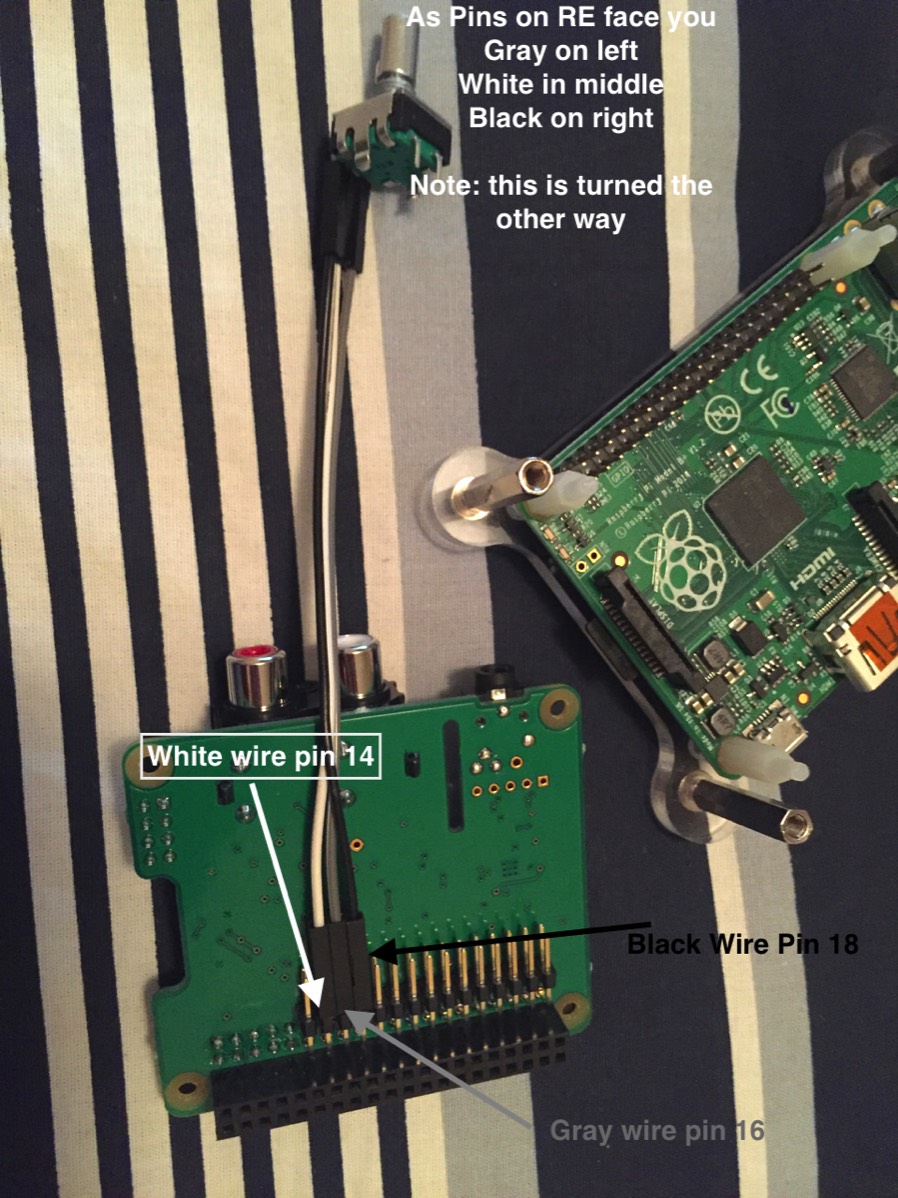
I did my best to depict it there but it is simple. Face the pins on the rotary encoder towards you.
Pin in middle goes to pin 14 on the DAC+
Pin on left goes to pin 16 on the DAC+
Pin on right goes to pin 18 on the DAC+
The outermost row of pins closest to you are even numbered pins. The pins closest to the circuit board are odd numbered ones.
Put it all together and boot and then download this somewhere. I made a directory called rot2
cd
mkdir rot2
cd rot2
git clone https://github.com/iqaudio/tools.git
now install this dependency
sudo apt-get install wiringpi
I could not get IQ_rot to work by running:
sudo IQ_rot&
as the IQAudio user guide suggests. So……delete that file. It’s of no use to you.
sudo rm IQ_rot
now do this:
sudo nano IQ_rot.c
scroll down to this area:
Ctl key + Y to save and exit. Now lets compile IQ_rot.c
sudo gcc IQ_rot.c -oIQ_rot -lwiringPi -lasound
It will make a new file called IQ_rot
You can now launch the file
sudo IQ_rot&
Play with the volume and it should work famously. You did it. Congrats. Now make it start at boot.
sudo VISUAL=nano crontab -e
add this:
@reboot /home/pi/rot2/IQ_rot&

Now that fancy rotary encoder has a push button. Might as well put it to work too. Let’s use it to issue a shutdown command. Take two more female to female pins. Attach one to pin 11 on the pin (that is GPIO 17) and the other on pin 39 which is a ground.
Now do this.
cd
mkdir shutscript
cd shutscript
sudo nano shutdown_pi.py
paste in this code. Lets be crystal clear. I did not write this code. I snipped it off the internet and changed GPIO 18 to 17 because i was already using 18.
#!/bin/python
# Simple script for shutting down the raspberry Pi at the press of a button.
# by Inderpreet Singh
import RPi.GPIO as GPIO
import time
import os
# Use the Broadcom SOC Pin numbers
# Setup the Pin with Internal pullups enabled and PIN in reading mode.
GPIO.setmode(GPIO.BCM)
GPIO.setup(17, GPIO.IN, pull_up_down = GPIO.PUD_UP)
# Our function on what to do when the button is pressed
def Shutdown(channel):
os.system(“sudo shutdown -h now”)
# Add our function to execute when the button pressed event happens
GPIO.add_event_detect(17, GPIO.FALLING, callback = Shutdown, bouncetime = 2000)
# Now wait!
while 1:
time.sleep(1)
Okay now lets start that at boot.sudo crontab -e
add this line
@reboot python /home/pi/shutscript/shutdown_pi.py &
By Golly, you have done it again. A press of the button should issue a shutdown command.


No problem until compiling the “IQ_Rot.c”, it creates the file “IQ_Rot”.
But when launching the “IQ_Rot” file, it says:
“sudo: IQ_Rot: command not found”
Any idea on how to solve this, please. Thanks in advance.
sudo IQ_rot&
I found his page very helpful. Thank you for posting it.
I had to make multiple adaptations – perhaps some of which were due to different hardware (I am using the IQaudio DAC+ which is physically different from your photo; it has 40 vertical pins); and/or software (I am running the 64-bit version of the latest Raspberry Pi OS; and changes since you posted these helpful instructions.
1. wiringpi no longer can be installed via sudo apt-get (sad story here: http://wiringpi.com/news/); I found a fork on github
2. IQ_rot.c would not compile for me, due to the #define directives for TRUE and FALSE (these were already defined in wiringpi.c, I think); I fixed this by changing the names of these variables to IQTRUE and IQFALSE in IQ_rot.c (maybe I could have just removed those #define directives from IQ_rot.c; I know almost nothing about C).
3. Also in IQ_rot.c I had to change card = “default” to card = “hw:0”
4. Also in IQ_rotc. I had to adjust the volume increment/decrement from its default of +/-10 (which was far too coarse) to +/-2 (this gives just over volume steps – from – 103.5 dB to 0 dB).
5. I was unable to run IQ_rot (or IQ_rot&) initially; I either needed to either specify the full path (/rot2/tools), or use ./IQ_rot if I was already in the /rot2/tools directory
I’m still unable to get this to work using crontab (it starts, but doesn’t do anything useful). So I just start it within a shell script that I use to launch Pianoteq – which I launch automatically already (not the best place for it, but it works).