
The subject line is “Add a temperature sensor to a wifi chip”. Why would you want to do that? I can think of a few reasons.
- Know what the temperature is in the attic and also use the chip to control an attic fan.
- Know what the temperature of the hot tub water is and have it send you temp alerts if the water starts getting cold, or even worse, too hot.
- Know the dew point which is vital when using a laser engraver which has a water cooled laser tube. Too much condensation means you’ll shorten the life expectancy or the tube or cause it to catastrophically fail.
- Have a remote temp sensor for other rooms.
- Monitor humidity where you store important papers, or cigars or stuff like that.
Now that we know it is useful, let’s do it. This is actually one of the simplest things you can do with an ESP8266 or ESP32 Internet of Things, wifi chip. It isn’t hard at all.
You will need:
- An IoT chip. I like these NodeMCU chips
- Dupont cables For this project you just need female to female. You don’t have to buy a whole kit of wires. That was just an example.
- Temp probe. I like the AM2302 however there are a few options. Also you can find them cheaper on eBay and Amazon. Only problem is you may get a knock off that may not work that great or work at all. I’ve had good luck with HighLetgo stuff.
- Laptop or computer with USB
- Micro USB cable (you probably have one laying around from a phone charger or various other device.
- Tasmota firmware. It is a free download. There are other firmwares such as ESPHome but I like Tasmota. There are a bunch of variants. We want a file called “Tasmota.bin”
- Flashing software – Tasmotizer for Windows (I can’t make it work on the latest MacOS X) or ESP-Flasher which I use on Mac.
Either flashing software is simple. Hook up your USB cable between the laptop and the NodeMCUand let it auto detect the port and then select the Tasmota file (Tasmota.bin).
So……..Plug in the NodeMCU to your laptop, open your flashing software and hit “Flash”. If it doesn’t work hold down the reset button on the NodeMCU when you power it up to get it into boot loader mode. Pretty sure the NodeMCU will just flash though without it. Another reason I love the NodeMCU devices. Typically the GPIO zero data pin has to manually be held to ground to get into boot loader mode. The NodeMCU takes away that geeky hassle.
Flash Tasmota on NodeMCU (click pics to enlarge)


Once the chip is flashed it creates a hotspot called “Tasmota-xxxxx”. The xxxxx is some random numbers usually. Connect to that wifi hotspot with your computer and in a browser address bar navigate to
192.168.4.1
The Tasmota wifi configuration will pop up. Put in your credentials and it will reboot. Not only that but the screen will tell you what the IP address is of the device you just flashed. Watch the screen carefully. For example, mine became: 192.168.1.215
Yours will be different.
Then go to THAT address in a browser bar once you are connected to your home network.
Now we have to configure some things. On the main screen click the Configuration button. Then “Configure Module”
Configure NodeMCU for AM2302 Temp (click pics to enlarge)


- Set the Module Type to “Generic (18)”, hit save, and it will reboot.
- Then set (D8) GPIO 15 to “AM2302”, hit save.
- It will reboot again.
Now unplug it, grab your Dupont Cables and connect it like this:
AM2302 to NodeMCU hookup (click pic to enlarge)

3.3v on NodeMCU to + on AM2302
G on NodeMCU to – on AM2302
D8 on NodeMCU to Data on AM2302
Now boot it up and you should get Temp, Humidity, and Dew Point readings!
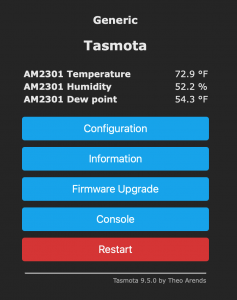
If it comes up in Celsius click the button that says “Console” and enter this command:
setoption8 1
Big F to you, you Imperial American! I’m of course joking. I bleed red, white, and blue!
That’s it! There is a LOT you can make this device do with the data it collects and I won’t get into that here. That data can be automated and alarms sent to you or texts sent to you with the appropriate Home Automation software. It’s insane what you can do with that. Here’s an example. I added the collected data to my Home Assistant Dashboard. I will probably mount this guy in the attic.
Home Assistant Tasmota Temp Data (click pic to enlarge)

I just wanted to teach you how to get Dew Point readings IN YOUR ROOM, NOT THE DEW POINT AT THE WEATHER STATION OR AIRPORT ACROSS TOWN!.
Rock on!