It’s been a hot minute since I played with my RTL-SDR’s. I have an Airspy Discovery HF+ which is an amazing piece of hardware, however it plays best with Windows software, specifically SDRSharp (SDR#).
The trouble is I spend most of my life on a Mac computer. On the same download page I linked above for SDRSharp is program called SpyServer. You can set up your Airspy HF+ Discovery to serve up radio over your network.
The trouble with that is the best software client to do that is SDR# which is Windows only. So in order to make it work on Mac here is what we will do.
Download Spyserver and extract the files in a folder somewhere. I just put it on my Desktop. Next open the spyserver.config file with notepad and make the following entries (in red). Customize for your use. Some of the items DO NOT NEED TO BE CHANGED. Personal information can be added if you decide to make your server available on the Spyserver network and then they’ll know it’s John Hagensieker’s, with a Magnetic Loop, in New Bern NC, etc, etc, etc.
# SPY Server Configuration File # TCP Listener # bind_host = 0.0.0.0 bind_port = 5555-6666 # List Server in Airspy Directory # list_in_directory = 1 # Owner Name # For example: John Doe L8ZEE owner_name = John Hagensieker KN4FMV # Owner email # For example: owner_email = youremailaddress.com # Antenna # For example: Random Wire/Magnetic Loop/Mini-Whip/Inverted V/etc. antenna_type = Magnetic Loop # Antenna Location # For example: 48.858332, 2.294560 antenna_location = 35,1048. 77.0441 # General Description # general_description =. Spyserver # User sessions # maximum_clients = 1 # Maximum session duration # In minutes. 0 for no limit # #maximum_session_duration = 30 # Allow clients to retune and change of gain of the device # allow_control = 1 # Device Type # Possible Values: # AirspyOne (R0, R2, Mini) # AirspyHF+ # RTL-SDR # Auto (Scans for the first available device) # device_type = Auto # Device Serial Number as 64bit Hex # For example: 0xDD52D95C904534AD # A value of 0 will acquire the first available device. # device_serial = 0 # Device Sample Rate # Possible Values: # Airspy R0, R2 : 10000000 or 2500000 # Airspy Mini : 6000000 or 3000000 # Airspy HF+ : 768000 # RTL-SDR : 500000 to 3200000 # Comment to use the device's default # device_sample_rate = 768000 # Force 8bit Compression Mode # The 8bit Compression mode has proven sufficiently good for most streaming use cases. # Use it to same some internet bandwidth. # #force_8bit = 1 # Maximum Bandwidth # Limits the maximum IQ bandwidth the clients can set # Recommended value for WFM is 200000 # Recommended value for narrow band modes is 15000 # #maximum_bandwidth = 15000 # FFT Frames Per Second # fft_fps = 15 # FFT Bins # Bins = 2^fft_bin_bits # fft_bin_bits = 16 # Initial Center Frequency # #initial_frequency = 7100000 # Minimum Tunable Frequency # Comment if using the device default # #minimum_frequency = 0 # Maximum Tunable Frequency # Comment if using the device default # #maximum_frequency = 35000000 # Frequency Correction in PPB # #frequency_correction_ppb = 0 # Initial Gain # #initial_gain = 5 # RTL-SDR Sampling mode # Quadrature = 0, # Direct Sampling I Branch = 1 # Direct Sampling Q Branch = 2 #rtl_sampling_mode = 0 # Converter Offset # Set to -120000000 to enable the SpyVerter offset #converter_offset = -120000000 # Bias-Tee # For AirspyOne only - Useful for LNA's and SpyVerter #enable_bias_tee = 0 # Buffer Size (in milliseconds) # buffer_size_ms = 50 # Buffer Count # buffer_count = 10
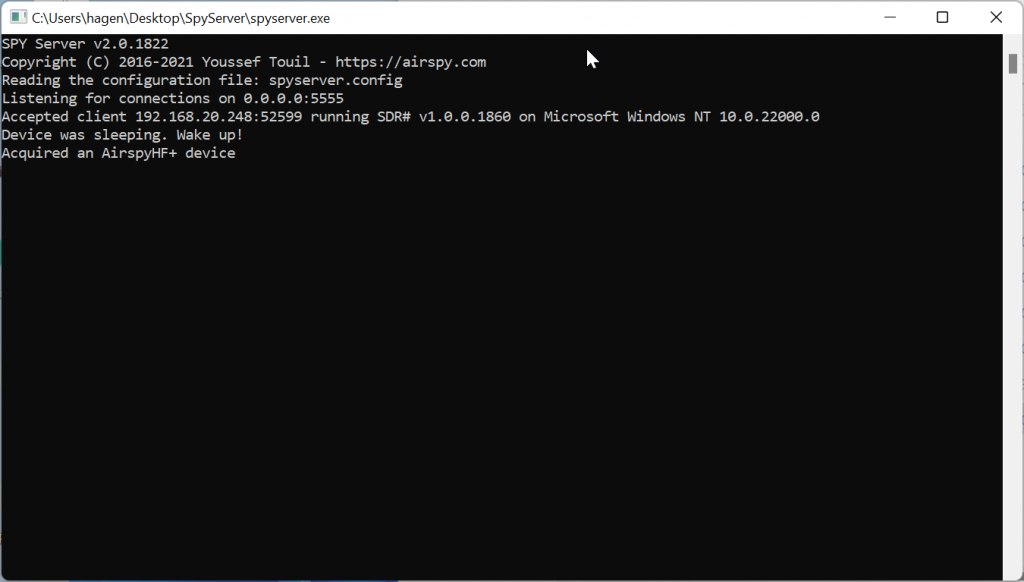
Once your config file is good to go simply save it and then double click on the spyserver.exe file. This will happen.
Spyserver Started (click pic to enlarge)
Now if you want to connect to this from a Mac we want to download a program called SDRPlusPlus. Scroll to the bottom of the linked page and select the one for sdrpp_macos_intel.
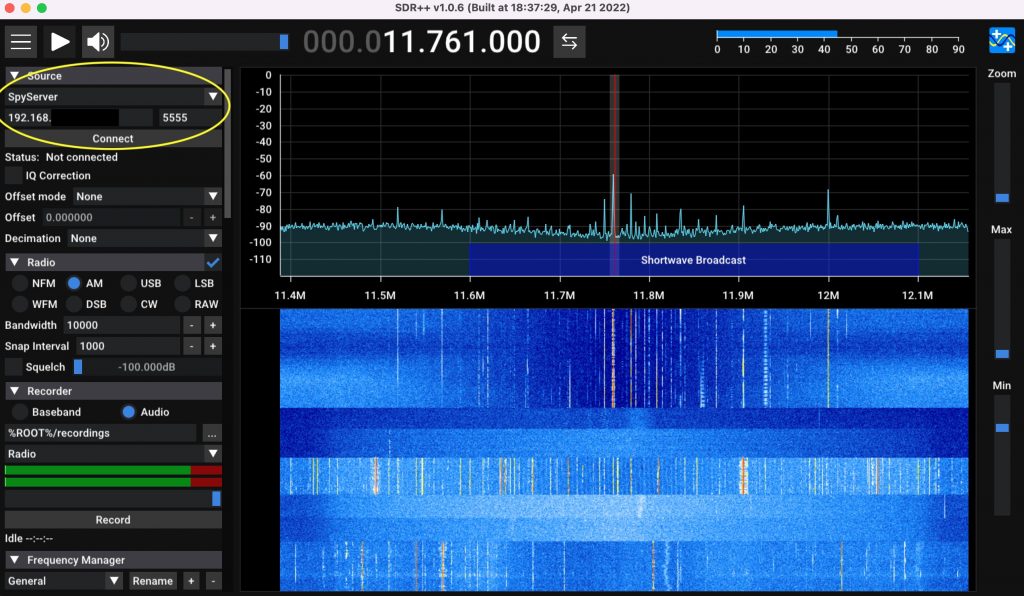
Simply download that, save it somewhere on your Mac and double click to launch. Under “Source” set it to “Spyserver” and select the IP address of the computer that Spyserver is installed on. Take note of the Port. Mine is 5555. It can be almost anything but it has to match on the client side.
SDRPlusPlus Spyserver Client (click pic to enlarge)
Take note that below the IP address is a “Connect” button. Click on that and then you still have to go to the top task bar and click the big Start Arrow >.
I had to set the Sample Bit Depth (appears after you click the Connect Button) to 8Units to get clear audio. I could use the full sample rate of 768000 on short wave radio but as I got past the FM bands in the Air Bands I noticed I had to reduce the Sample Bit Depth to 384000 to get clean audio. So it’s not plug and play like using SDR# client connected to SDR# server but you can make it work!
If you port forward to the IP:Port you can access this server from anywhere on the internet. If you have a VPN as I do you can connect to your network and access your server and then your network port is not exposed to the whole world. The range for this is roughly 0 KHz – 30 MHz and 60MHz – 260 MHz. Using different SDR’s could get you 0KHz – 1800 MHz. I opt for the HF+ primarily for Long, Medium and Short Wave bands. The Airspy Discovery HF+ excels at those coverages.
Bob = Uncle. Done.


Thanks for the SDR post! Looking forward to more!
Pingback: Using a SDRPlay RSPdx Over The Network | John’s Tech Blog
I have an ICOM 7100 transceiver with an IF tap using an AirSpy R2 SDR. I normally use the AirSpy locally with HDSDR which can also control the 7100, so the waterfall shows the correct frequency and can be clicked on to change the bands and frequency of the 7100. I notice that SDR++ has a Rigctrl server, but I don’t know how this is all supposed to be set up. Are there practical examples anywhere?
Thank you for this tutorial. I was trying to use spyserver on the server and gqrx on the client and I could see the waveform but it would not produce any sound (perhaps a setting but I couldn’t figure it out). Anyway once I found sdr++ (the link on the page doesn’t work), it needed a little tweaking – select source: spyserver, and then enter the ip address of the spyserver server, and click the start button. That easy!
Again thank you for this tutorial. Saved me more time banging my head against the wall.
=)