
GPS TRACKER FOR $10 A MONTH
I have a little pop up A frame camper and I’m always afraid it is going to drive away. Camper theft is a thing. Clearly I needed to get or make some sort of GPS tracker.
There are a lot of ways to do this, and some better than others and I dare say that the way I’m doing it may not be the best way, but the way I’m doing it ensures economy. And by that I mean not consuming excessive cellular data.
I really thought I’d slap a 4G HAT on a Pi and Real Time Track with a SIM card. It’s really not that easy and I learned a few things along the way. The first thing I learned is that real time tracking uses data and unlimited SIM cards are generally in the $60 a month range. So the smart play (at least for my situation) is to have the Raspberry Pi text me its position on a semi regular basis. Remember, if it is stolen I only need to use the GPS tracker to track it down once.
Before I go into details let me preach on it.
So I started with:
- Raspberry Pi 4
- Waveshare SIM7600 4G GNSS HAT
- Tello SIM card. Unlimited Calls and Texts. 1 GB monthly data $10
- Python script file to get GPS and text the coordinates to my phone
This works but there is one gigantic problem.
REAL TIME CLOCK
I set the script up to text me its location once an hour initially from 7AM to 8PM. And here comes the problem. My camper is parked outside obviously and is just out of range of my home’s wifi. The Raspberry Pi has no real time clock (RTC) so when it gets powered up it has no freaking clue what time it is. Instead of getting the texts on the hour I might get them at 40 past the hour and the hour could be 8 or 12 hours off. This GPS Tracker project just got more complicated.
There are a lot of ways to tackle this problem however I want to do it cheaply and as minimalistic as possible so I can hide this thing in the camper. You can add a real time clock to the Pi but they plug into the GPIO pins and your SIM HAT is ALREADY PLUGGED IN AND COVERING ALL THE PINS. You can solder jumpers or breadboard the parts but now we’re getting kind of huge. The bigger and more complex this is the more likely the bad guys will find it and disable it.
The GNSS (GPS) was outputting NMEA data on /dev/USB1 so I tried installing GPSD on the pi so I could set the time from GPS which is quite accurate by the way. However, when I snatched away the GPS serial port the script file I was using to send me coordinates no longer worked. I’m certain I can get the GPS to do double duty but my skill limit is stretched on this one.
OPTION 1
I could add a second GPS unit to the USB on the Pi. I can do this quite economically, somewhat minimalistic and then the time could be set from that GPS serial device.
OPTION 2
Utilize a Raspberry Pi 4 Compute Module and 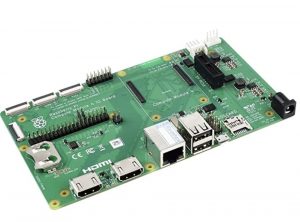 which has a real time clock built in.
It’s quite a bit bigger than a Raspberry Pi 4 but with the addition of a CR2032 battery the Pi will keep time.
Adding a second GPS unit would be cheaper, however, I have a couple of these boards and some Compute Modules laying around already.
So from my economic standpoint I’ll go the Compute Module route so I don’t have to buy anything else. The SIM7600 HAT will slip right on and should work exactly the same way.
I NEED MORE POWER, CAPTAIN
However, now I have to get some other brick to power it. I was currently using this guy to power the Pi in the camper.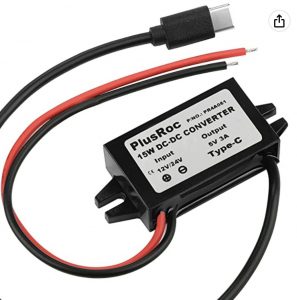
Additionally, I accessed the electric compartment and just tapped into 12 volts and then the converter has a USB C end that supplies power to the Pi.
Very small, quiet, and easy to hide.
But the Compute Module needs 12 volts and gets powered from a barrel connector instead of a USB C connector. 
So now you need a barrel plug adapter like this to power the Compute Module board.
I actually have a bunch of these as well so I think I should be able to easily rig this up.
I’m going to leave this blog where it is for the moment.
Next time I tinker with this I’ll build up the Compute Module and provide some more specific details to this entry.
UPDATE: I decided to build out the Compute Module 4 on the IO board with the Real Time Clock enabled.
Other thank occupying more physical space the instructions are the same on the CM4 form factor. The Real Time Clock is NOT enabled by default though. To enable it you must go to /boot/config.txt and add the following lines at the bottom of the file, hit CTL+X then Y to save, then reboot the Pi.
[real time clock]
dtparam=i2c_vc=on
dtoverlay=i2c-rtc,pcf85063a,i2c_csi_dsi,addr=0x51
Now the RTC should be enabled and working provided you install a CR3032 battery.
SOFTWARE TIME
I won’t post installation instructions because I followed them from the Core Electronics website and can confirm it works. Those instructions seem to come from the manufacturer, Waveshare’s Wiki page. Then scroll down about halfway down that page to find the Raspberry Pi Initialization Settings. One thing I like about the Core Electronics page is that there are some additional scripts at the bottom of the page, specifically one that gets GPS coordinates and then texts them to you, specifically the one named FindGPSthenSMSFinal.py.
Once I modified that file by adding my phone number and successfully got my coordinates I wrote a super simple script file to launch it.
sudo nano gps.sh
then add
#! /bin/bash

python /home/pi/SIM7600X-4G-HAT-Demo/Raspberry/python/GPS/./FindGPSthenSMSFinal.py
Then
chmod +x gps.sh
test it with
./gps.sh
and if that works then make a cron job. I have it set up to text me every top of the hour from 8 AM to 7PM
crontab -e
enter
0 8-19 * * * sh /home/pi/gps.sh &
hit CTL+X then Y to save the file and it should be working. Now if the bad guys steal my camper it will tell me where it is every hour from 8AM to 7PM. Enough time to call law enforcement and send them coordinates. I may modify these hours of texting.
GPS TRACKER INSTALLATION TIME
CM4 4G GPS
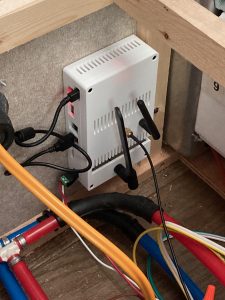
Now to hide the CM4 board in the camper. I tapped into a 12 volt line and used that barrel plug adapter to power the CM4 IO board. 3D printed a case but had to drill some antenna holes and I had to take a Dremel to cut out where the micro USB connector goes on the SIM7600 board. Looks like it belongs there.
In the enclosure the flashing lights cannot be seen. And best of all the Pi CM4 is silent. No fan noise, no hard drive noise.
Silent.
This was maybe the coolest project I’ve done with a Raspberry Pi and the only con is that the GPS tracker costs $10 a month. As far as I’m concerned, that is like insurance.
Gotta ask- why use an RP4 when a Zero W or Zero 2 W would handle this limited computing power requirement? A plus- it’s smaller!
Of course, you have to get one first…
Excellent point Don. I did say it wasn’t necessarily the best way………It might be better to drop that SIM card in an old Android phone and you could real time track but then again if you did you could suffer a data overage which could cost money. I want to be able to call the cops and say “Last known address is here” and not get a gigantic data overage.
And of course I just love playing around with Pi’s. I’ve migrated this to CM4 and CM4 IO board.
Moin John, warum hast Du nicht die internen USB Anschlüsse genommen? Hätte dann innen verlegt werden können. Ohne PCIe reichen auch 5 V Spannung. Ein Foto ohne Deckel wäre noch schön. Gruß Bernd
How about using an apple air tag for $30? Tile tracker is the same thing. No cell service needed on the tracker itself. It uses Bluetooth on any phone that passes by to indicate it’s position.
I have an Air Tag hidden in the camper as well. Great minds think alike!
This is a great DIY solution for tracking a camper! Using a Raspberry Pi for GPS tracking at just $10 a month is both cost-effective and highly customizable. It’s impressive how technology like this can provide real-time location tracking without expensive subscription services. Definitely a useful project for anyone looking to enhance their vehicle security!