
Ortur Laser Master 3 LE Review
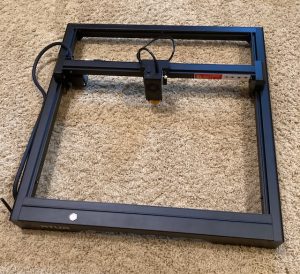
Ortur LM3 LE
I’ve been doing desktop diode lasers since they became mainstream in about 2019. Prior to that they were mostly DIY. Ortur was pretty much first to the game with the Laser Master 1 and subsequently the Laser Master 2. I owned 2 of those. I’ve since picked up a Laser Master 3, an Aufero 2 and now it is time to do an Ortur Laser Master 3 LE Review.
I wasn’t really a fan of the Ortur Laser Master 3 and I wrote at length about that here. My LM3 works fine but I generally think the design has some issues. It sits so low as to be almost unusable for anything over 400mm in width unless you raise the machine. Also there are support issues regarding the lens protective glass that just aren’t right.
Unboxing And Assembly Video
HA! I don’t do that here. Ortur lists what’s in the box on the product webpage and they have a great assembly video. Why people think showing what’s in the box is useful in a video when those components are listed in a chart, I’ll never know.
First Observations
My first observation is that they raised the machine by elevating the 4 corners of the frame. But by doing that it makes it nearly impossible to pass items through from the front to the back.
Still a poor design
So, they raised the machine to lift the X motor so you can pass things through from the sides but they almost totally obstructed front to back pass through.
I’m really not sure what they are thinking over there at Ortur.
Once again the entire machine will have to be raised to obtain adequate clearance.
Another Key Observation
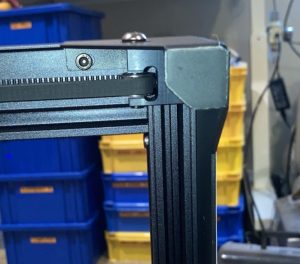
The original belt tensioning mechanism on the Laser Master 3 was a complete Piece of Shit. There. I said it. It was built into the frame and mine was poorly machined and had damaged threads. I had to run a tap through mine to be able to complete the build. The new tensioning mechanism is basically identical to the xTool D1 Pro. It has a removable block which means the whole frame isn’t borked if the threads get fouled up.
Other than that the other noticeable change is that there is no more emergency stop button. That’s swell, but the only way to turn the machine off quickly is to hold the button for a few seconds. Not exactly what you want during an emergency. You had better just pull the plugs.
Speaking of plugs, the USB Cable is a USB A to USB A. Not a real common cable. Why’d you guys do that?
The WiFi antenna is different and more robust than the one on the LM3. That I like.
Building the machine was a piece of cake and I did it in just a few minutes. Easiest build yet. Kudos.
The last thing I noticed was that there is no additional connector for hooking a rotary up. The LM3 has an open port and a switch that controls whether it runs the Y motor or a rotary motor. If you build the rotary up and tear it down a lot you’ll probably want the to buy the LM3 and not the LM3 LE.
Mounting
The bottom of the legs has an unusual shape that might make it a little more challenging to secure the laser to a spoil board however, I promise that someone will post a solution on Thingiverse soon. I’m thinking of taking the rubber feet that I removed from my Ortur LM3 for the FFT legs, and drill some holes and mount the rubber feet to the bottom of these pads.
LM3 LE footings
That could raise the machine a little bit more and permit me to secure it to a spoil board. A spoil board is 100% necessary by my estimation and mounting a laser to a spoil board is also mandatory. There is no way you’ll get the published speeds with the laser dancing around on the table.
Finally, after sizing up the situation though the front left footing can’t really be drilled as the motherboard sits right where you’d need to drill a centered hole (not depicted).
I could drill 3 of the 4 feet and secure them with machine screws and nuts but drilling a hole near the motherboard is problematic.
This could be a situation where that particular rubber foot would have to be super glued in place. I will 3D print up some spoil board mounting brackets and assess whether or not I want to drill and glue. Also someone is likely to design some perfect 3D mounts so I’m not going to do anything too drastic just yet.
Using The Machine
Despite the fact that I think the Ortur Engineers have not quite nailed the overall design the fact is that the laser itself performs quite adequately. It’s a very good laser once you get past the design flaws.
![]() Because there are no limit switches, homing the machine is a painfully slow process. If the laser head is far from home the user should manually move the laser closer or use the “set laser position” button in Lightburn. Trying to adjust the GRBL code to speed things up only introduces failures in the homing process. You’re stuck with slow homing speeds.
Because there are no limit switches, homing the machine is a painfully slow process. If the laser head is far from home the user should manually move the laser closer or use the “set laser position” button in Lightburn. Trying to adjust the GRBL code to speed things up only introduces failures in the homing process. You’re stuck with slow homing speeds.
Moving the laser head manually is sketchy and probably shouldn’t be done though. Moving the motors can back feed voltage onto the motherboard and kill it.
Ortur…….they have these things called “diodes”. Look it up.
Back to the “set laser position”. Use that to move the laser close to home and then hit the home button. Watching the laser creep home is like being on an elevator that stops at every floor with stinky people inside with you.
Laser operations can be fast, crisp, and the machine has great repositional accuracy meaning it will engrave on the 2nd pass exactly where the first pass went down. I have no beef with the operation of the laser, just with the guy who drew the frame.
Conclusions
The LM3 LE is a more than adequate laser that works well. Very well. The design is improved over the original LM3 but some pretty glaring details were missed.
While Ortur tries desperately to get a 20 watt laser (not yet available) out the door other companies have released 35 watt lasers and xTool is coming out with a 40 watt laser soon.
Sadly, Ortur was first to the laser game but they just aren’t really adding any new innovations here with the LE. They are just cleaning up some of the poor design elements of the LM3.
Because they use the same LU2-10A laser head I’m betting the issue with the protective lens cracking is still the same. If it cracks, you get a new one only after you prove it cracked and then only during the warranty period. Unsat.
As of the writing of this blog currently no manual, firmware, or the GRBL defaults are listed on the Ortur website for download. Also Unsat.
Dollar for dollar, the xTool D1 Pro is still your best bet.