Sculpfun S9 Limit Switch Installation

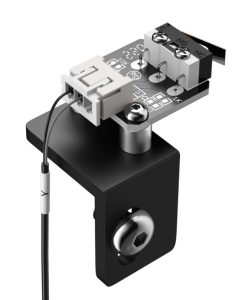
Sculpfun S9 Limit Switch Kit
The Sculpfun S9 is a great laser and is available at a fantastic price point. Any time the price is low on something you can bet a bell or a whistle was left out to keep the final cost down. One way to cut corners on a laser is to offer them without limit switches. Without switches, the laser will not automatically return to the home position (X0, Y0). Positioning is accomplished manually. Fortunately there is a Sculpfun S9 Limit Switch kit available for purchase.
There is nothing wrong with a laser that does not have limit switches. In fact, some people prefer lasers that don’t have limit switches. A lot of the time, I am one of those people.
Equally safe to say that there are a lot of people out there who wouldn’t own a laser that didn’t have limit switches. Anyway, with the S9, at least you have the option.
Cost
The cost of the kit is $27.99 and is all inclusive. The kit works for both the S9 and the S10 models. There are differences in the installation procedures but the kit contains all the stuff you need to install on either model. That probably means you’ll have some stuff left over in your kit when you are done with the mod.
Installation
There is an installation video here. It seems to be the only documentation on the procedure I could find. There is also at least one GIANT problem with this video. I should preface that statement by saying “depending on what motherboard you have you might run into a GIANT problem”. More on that later.
Also know that if you install this you will lose a little usable area. I went from 400 mm x 410 mm to 380 mm x 390 mm. I can probably squeeze 5 more mm’s out of each axis but for now I’ll stick with those measurements.
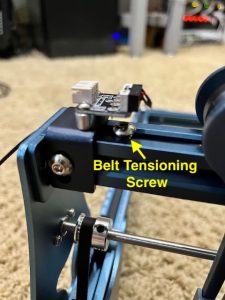
When installing the switch on the X rail they don’t mention in the video that if you install it to the right of the belt tensioning screw that it will reduce the usable area of your laser even more than normal.
I overcame that by loosening the tensioning screw and moving it over to the right. Then I installed the limit switch as far to the left as I could. It fits neatly under the limit switch board and has adequate clearance.

Move The Belt Tensioning Screw
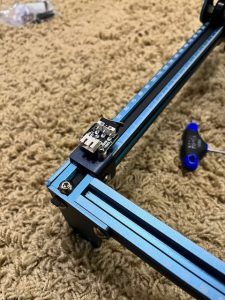
Mounting both the X and Y switch is easy money. Routing of the wires is explained in great detail in the video and I won’t rehash it here. But I will show you a pic of the Y switch mounted.

Y Switch Location
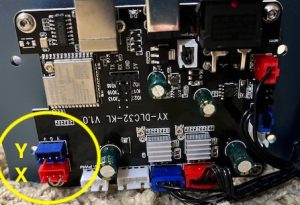
Position the Y switch as close to the rail as you can get it. And just like that, switch mounting is completed. Route your wires back to the mainboard My board is marked DLC32 and my connections are in the lower left corner of the board.

Connectors
Firmware
Here is where it gets ugly. On the YouTube video they provide a link to download the new firmware which must be flashed onto the board.

Firmware Download
When I flashed the DLC32 firmware bin file from Windows as per the directions (The Mac tool doesn’t work) it seemed to install. However, the laser, while connected to LaserGRBL or Lightburn, wouldn’t do a single solitary thing. Clearly this is NOT the right firmware for my board. The firmware reports as GRBL 1.1
After scouring the internet for a while I found a post in the Sculpfun section of Lightburn of someone who had the exact same problem I did.
It would seem that the new Sculpfun S9 ships with the S30 motherboard, or at least mine did. Installing the S30 firmware from here worked. And that is to say after you change the Machine Settings to enable homing as per the YouTube video.
NOTE: Once the S30 firmware is installed the GRBL version reports as GRBL 1.1h
Why?
I hate when this kind of thing happens. There is absolutely no excuse to not provide the correct link to the proper firmware from the QR code in the included manual. At the very least a manual should ship for the machine with some documentation on what motherboard version your machine has. It’s not unusual for a manufacturer to have multiple versions of a mainboard. And with a global chip shortage it is probably less unusual to do this sort of thing. But by golly, YOU HAVE TO DOCUMENT IT.
I have no beef with the Sculpfun hardware. i don’t have any beef with the operating firmware. But clearly the documentation needs updating.
Limit Switch Recommendations
If you absolutely positively want limit switches and you are technically inclined you can:
- Buy an S9 or S10 and be aware of different main board versions and realize there may be some fiddling needed to find the right firmware.
If you are not technically inclined enough to install the kit with the possible challenges I have presented here then:
- Buy an S30 which comes with limit switches and an automatic air assist.
Wrap Up
At the end of the day I got the limit switch kit installed and functioning correctly. Everything works and it works well. And it would appear that I have the latest and greatest motherboard that they ship in their flagship model. That is a win, in my opinion.
Again, my only beef is that it should have been documented either in my owners manual (there is no owners manual that I can find) or it really should have been documented in the limit switch kit. All you are given is a link to a Google Drive folder from a YouTube video.
I really love the Sculpfun S9. It is an amazing laser for its price point. The limit switch kit, also is top notch hardware. It installs cleanly and easily.
But when you install the provided firmware and it doesn’t work and the only solution is found outside the Sculpfun website, then the documentation needs to be cleaned up.
I have reached out to Sculpfun for the correct firmware and procedures and will post them if they provide that information.
UPDATE: SCULPFUN IS SHIPPING NEW S9’s WITH 32 BIT MOTHERBOARDS
Dear customer,
The motherboards we are sending now are all 32-bit motherboards with attached ESP32 chips.
We will also use 32-bit motherboards in subsequent shipments.
There are two types of our 32-bit motherboards, one is that the air pump switch can be controlled through the motherboard and the other is that it cannot be controlled through the motherboard.
The motherboard that can control the air pump is used in the S30 series machines. The S9 and S10 motherboards are also 32-bit, but they do not have the function of controlling the air pump switch through the motherboard.
If you do not want to enable the limit switch function by updating the firmware after installing the limit switch, you can consult my video to enable the limit switch function in the machine configuration parameters. https://www.youtube.com/watch?v=et5Fx9_Lovw
Video Recap
[kad_youtube url=”https://youtu.be/pKXf6t4dO_E” ]

Really useful guide and I thank you for providing it. One update for you if I may. I’ve bought an s9 and it came with what appears to be the s30 board complete with a socket for the air pump switch, marked “air pump. So it appears they are mixing it up further. Also I didn’t need any software or firmware updates. I just emailed homing in lightburn. The board is marked de by ls 20221115.
Same for me. Just plugged everything and it was ready to go.
I wasted more than 3 hours by flashing the wrong firmware. It was your Post that helped, getting it back alive. I got some problems in Lightburn when it reaches one of the limit switches and I haven’t figure it out where I set the X0,Y0 but that will be my Problem tomorrow. Thanks for the very useful help.
I just got a new SculpFun S9, It has a newer motherboard. It is showing GRBL 1,1h I am waiting for the limit switches to come in to test to see if it is as simple as connecting them and enable in Light Burn That would be so Sweet!
hello you can make them yourself (DIY) with 2 Micro Switch 2/3Pin NO/NC you must use the ground and the NC and on the motherboard connect the 2 right pins on pin 3
Assim como alguns aqui, tive o mesmo problema e gastei horas inutilmente tentando resolver o problema e instalando firmwares errados. Felizmente encontrei essa pagina que foi a solução para meu problema! Assim que atualizei para o firmware da s30, tudo voltou a funcionar. Fico extremamente grato por essa publicação de ajuda extremamente útil!!!
I want to share my experience in case anyone runs into similar issues. I bought a new Sculpfun S9 Pro and a limit switch kit. Installation was easy enough; I have experience with tinkering with 3D printers. Everything was set up correctly, but whenever I requested the machine to home, it would grind into the left side and bottom of the machine. When I query the controller, it reports whether a switch was pushed. I spent days troubleshooting, and it ended up being that the plugs for the X and Y limit switches were mislabeled, and I needed to switch the cords around. After doing this, it worked flawlessly. Kinda miffed that the labelling on the board wasn’t correct, but I’m glad I figured it out.