
ACMER M2 Rotary Review
ACMER provided me their M2 Rotary Roller ($89) to review. I am no stranger to laser rotary devices and own at least 7 at the moment.
Many of these rotary devices are similar, however, there are elements that make some better than others.
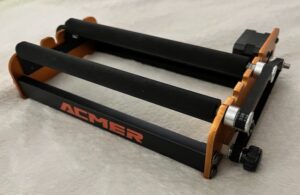
The first thing I want to say about the ACMER M2 Rotary Roller is that it COMES ASSEMBLED.
There is nothing quite as enjoyable as taking parts, belts, motors and gears out of a box that contains no instructions and trying to put it together. That simply isn’t the case here.
And it will engrave items from 4mm to 138mm in diameter. Within that range are 4 width adjustments of 20/40/60/80 mm.
Included Parts And Connections
Also, not only does the M2 come assembled but it also includes the necessary cables for hook up and a separate stand with rollers for leveling the engraving area of the round object you place on the rollers. I have a lot of confidence that you could hook this rotary up to almost any desktop diode laser with the included cable mix.
First you must connect the M2 Rotary to the Y axis of the machine. This means you must remove the JST connector from the Y axis motor on the laser and plug it into the rotary.
I’m just going to say this one time (with emphasis):
An ACMER P1 S Pro Laser or the ACMER P1 laser are both inexpensive lasers. If you are doing a side hustle and one component of your hustle is round objects such as cups or mugs you should BUY TWO LASERS AND SET ONE UP EXCLUSIVELY FOR ROTARY OPERATIONS.
There. I said it. JST connectors fit tight and are kind of flimsy as it relates to continual removal and insertion of the connector. You are kind of rolling the dice on damaging your cable or connector by swapping configurations a lot. You may think I’m crazy for recommending two lasers but I am not. Additionally, this also provides you a valuable back up machine in case one goes down.
Go hang out on any laser forum for any brand of lasers and you’ll find dozens of these Karen-esque posts: “My laser broke and I have orders to fulfill. This is unsatisfactory”.
Lightburn Setup
The product page states this:
“Simply plug in and start using it,no complicated setup needed.”
That’s somewhat true, but there is some setup required to use with Lightburn. Let’s look at the rotary settings, shall we?
PRO TIP: Buy a digital caliper to make your life easier. I recommend one of these.

Ensure that:
- Roller is selected
- Rotary is enabled
- Y axis is selected
- Roller diameter is accurate (mine is 16mm)
- Insert object to be laser-ed diameter or circumference. The other field will auto populate.
Lastly, you need to determine what the mm per rotation setting should be. Simply take a round item and draw a rectangle. Conversely, when the rectangle is engraved onto the item, the ends should meet perfectly. Simply tweak the “mm per rotation” value until you achieve that. This video demonstrates.
[kad_youtube url=”https://youtu.be/qlKabwRWibE” ]
Now all you need to do is to ensure the diameter or circumference values are correct for subsequent engraving operations.
Let’s Test It Out
I set the laser up on 4 cans of beans to elevate the machine. That is the oldest trick in the book that laser operators do in a pinch to raise Z height. If you intend to do rotary operations regularly I strongly recommend buying proper risers for the machine.
Anyway, my first actual rotary engraving came out exactly as anticipated. Have a look:
[kad_youtube url=”https://youtu.be/kxM2Vg1IrW8″ ]
The ACMER M2 Rotary Roller performs flawlessly. The adjustment distances are more than adequate for most operations but I feel like the included stand with rollers is a bit too tall in its lowest position.
I was going to engrave a tapered mug, and I still could have by raising the M2 a bit. In the interest of simplicity I opted to just cut a slab of broom stick off. Engraving odd shaped items takes some ingenuity and lots of scrap pieces of wood. Again, elevation of the machine and the rotary are much simpler if you own two lasers and one of them is dedicated for rotary operations.
Quality
Quality is great. The rotary is solid and made much sturdier and is much better designed than similar rotary devices from a few other companies. And it is attractive and matches the color theme of the ACMER P1 S Pro laser. Belt adjustment is easy with one caveat.
When I adjust the roller separation distance, the bushing on the tightening end does not retain and falls out. It is pretty small and easy to lose. I probably should put a drop of thread locker on mine.
Final Thoughts
For the price, the ACMER M2 Rotary Roller is a steal. This gives you the ability to expand your side hustle by engraving on round items. I’d strongly recommend using the riser system mentioned earlier. A laser that has a separate plug in and switch for the Y motor is also recommended (if you switch from standard to rotary operation a lot).
John’s Tech Blog digs the ACMER M2 Rotary Roller, a lot!.
Absolutely brilliant. Just purchased the M2 for my Acmer P2 20W Laser and have been trying to find these settings online with no joy