
ACMER P3 2IN1 Laser Engraver Review
ACMER P3 2IN1
Someone has FINALLY done it. ACMER has made a FULL SIZED laser engraver that has both a 2 watt IR Laser and a 10 watt blue diode laser in a single module. Enter the ACMER P3 2IN1. My readers can use the code Johncode for 15% off at the official site. That link is an affiliate link and it helps me keep this website afloat.
Also it can be purchased from Amazon. My readers can use the code 208UHVU7 for 20% off.
I know you are probably thinking that there are several lasers on the market that have an IR and a blue diode, and you’d be right. But, none of them have an engraving area of 400 x 390 mm. Everything that is out there now is 130 x 130 mm or less.
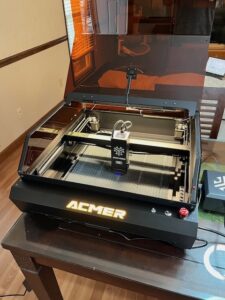
Also, the desktop diode laser is only about 6 years old. Everything prior to 2019 was probably a DIY hobbyist build. My first laser in 2019 had end stops and really nothing else. My how we have come a long way since then. Laser engravers these days such as the ACMER P3 are in self contained enclosures with eye protection. We have gone from Class 4 to Class 1 regarding safety. Class 1 being the most safe. The ACMER P3 has lights, air assist, a camera, and emergency features. The bottom of the enclosure comes with a honeycomb panel and a bottom clean out drawer. The bottom tray also keeps you from laser engraving the top of your wife’s table.
Watts Up?
While power seems to be increasing on desktop lasers, so does the laser spot size. All I can say about that is that the higher the number of watts, the larger the actual laser spot size is. Subsequently, the smaller the laser dot size is, the more detailed the engraving can be. Regarding spot size, most are actually rectangular rather than circular. The ACMER P3 2IN1 has a laser spot size of 0.06*0.04mm/0.02*0.02mm. (Blue Diode/IR).
I dare say that most of the engraving tasks I do could easily be done on a 5 watt or even less machine. Also, the higher the wattage, the higher the cost as well. I personally think that most laser consumers buy a lot more laser than they need.
Fortunately, for me I also have the ACMER P2, 33 watt version. Here is the cool part. The laser module from the P3 will work on the P2 making the P2 a super machine. Sadly, that doesn’t work both ways. You cannot put the P2 33 watt module on the P3.
Packaging And Assembly
Here is the best part. The machine comes fully assembled. All you have to do is to remove some tape, remove 2 plastic blocks that locks the Gantry in place, and then hang the laser module. Packaging is amazing and well thought out. Most items are already inside the laser.
ACMER P3 Packaging (click pics to enlarge)


I was up and running in no time. Also be sure to read the de-boxing card that is included before you begin your setup. Had I not read the card I probably would have initially missed the step about removing the blocks that hold the gantry in place for shipping.
ACMER P3 2IN1 Blue Diode Testing
Usually, I would just zip off the words “ACMER P3” and film the whole thing as a first test. Oddly enough I took the cork coaster sample in the pack and engraved a split font with my name on it. Because of the length of time it took I abandoned trying to video it. Here is how the first burn turned out on the 10 watt blue diode laser.
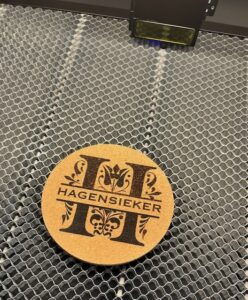
Engraved Coaster
It really turned out nice and uniform in presentation. And it holds my margarita nicely on my work bench.
ACMER P3 2IN1 IR Testing
I engraved two items. One was an Apple MacBookAir brick but unfortunately my camera was out of focus. I followed it up by engraving a logo on top of a tin container. Here is how that turned out.
[kad_youtube url=”https://youtu.be/Wbkg1jScyWo” ]
Government logos typically pack a lot of art in a very small place. It is a testament to the P3 how precise the results are.
Lights, Camera
The interior of the P3 is well lit and is controlled by a switch on the right rear of the machine. The other switch located back there controls the exhaust fan. The addition of a camera is a really nice touch. There are just a handful of lasers with built in cameras out there and it is a gigantic asset to the operator. Especially considering there is a dark colored hood on the machine. The camera needs to be calibrated in Lightburn. Additionally, you need Lightburn to use the camera.
Calibration
There is no need for me to discuss calibration because the ACMER P3 User Manual has excellent step by step instructions. Follow the manual. They also provide a calibration card and 5 pieces of 100 x 100 mm wood for alignment testing. Perfect!
NOTE: Make sure to remove the camera lens cover before starting!
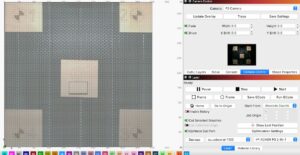
Camera Lens Calibration and Alignment Calibration
The manual has a step not included in Lightburn. After the Alignment Calibration you go into the camera controls and draw a rectangle. Then you reset your overlay and repeat. Mine worked perfectly. (I had my rectangle set to FILL in the beginning which explains the thick bottom).
Now let’s align something. I have some leatherette bottle openers that I engrave and sell sometimes. The camera makes it super easy to get perfect alignment.
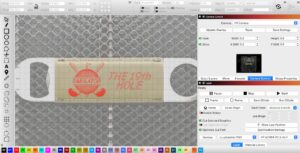
Camera Alignment
And here is the finished product.

Finished Product
The overhead camera is awesome and my project turned out as expected.
Next I will magically turn this bottle opener into a $20 bill. Easy money.
All in all the ACMER P3 2IN1 is an amazing laser engraver with tons of bells and whistles.
I’d like to say the evolution of the desktop laser engraver is complete but people just keep making them better and better. I can’t wait for what is next and I’m eyeballing the conveyor system ACMER sells as an accessory.
Overview Of ACMER P3 2IN1
I did a quick walk around video for the P3.
[kad_youtube url=”https://youtu.be/zEKTd8xqU2c” ]
Recommendations
Yep, I have a couple. The first one is that the laser module is a single solid piece. There are some similar modules where the lower portion is magnetic and can be removed if needed. Having a solid one piece module means the widget you are engraving must be flat and it makes it hard to engrave something like the interior of a box or bowl unless you de-focus a lot.
Next I wish it had a USB C connector instead of a USB B connector for connecting to a computer.
Other than that I can’t really think of anything for a wish list.
Final Thoughts
I’ve reviewed several ACMER laser engravers and have never had a single issue. While ACMER provides me the machines to review they have no editorial control over what I write. If I stumble across a deficiency I’ll write about it. As always I think that most lasers work and work just fine. The defining point for a consumer should be after sales service and support.
Along those lines I love that some ACMER laser modules can be used on other ACMER lasers. Hypothetically if my P3 motherboard died I can take my 2IN1 laser module and put it on my ACMER P2 and I’m right back in business. I think the consumer should factor something like that into their business plan to allow for compatibility.
The ACMER P3 2IN1 is about as modern a laser engraver as you can buy. It has all the safety features and includes a camera and air assist. I really don’t see how you could go wrong by getting one of these.
Finally, I’m not a guy who desires maximum wattage. 10 watts is plenty and I dare say maybe even too much for most operators.
JOHN’S TECH BLOG THINKS THE ACMER P3 2IN1 IS THE MOST ADVANCED LASER YOU CAN GET CURRENTLY
Your discount codes do not work. Was ready to order from your link.
Thanks for the review.
I don’t think that was an affiliate link and the codes they gave me were probably only good for a couple of weeks. Thanks for letting me know.
Pingback: ACMER P3 48 Watt Laser Module - John's Tech Blog
hola! tengo la acmer p3 2 en 1 no he podido calibrarla me ayudarias o explicarias? Gracias