
First you need to download the latest Raspberry Pi Raspbian OS from here. Get whichever version you want but I like to get the desktop version so I can VNC into it as it makes it easier.
If you have never done this connect your Raspberry Pi to a monitor, keyboard and mouse. If you are an old salt with Linux then just run headless and SSH into your Pi.
Once you download that file UNZIP IT. UNZIP IT. The file will end with an extension of .img
Do NOT try to burn the zip file to your SD card. UNZIP IT AND GET THE .IMG FILE.
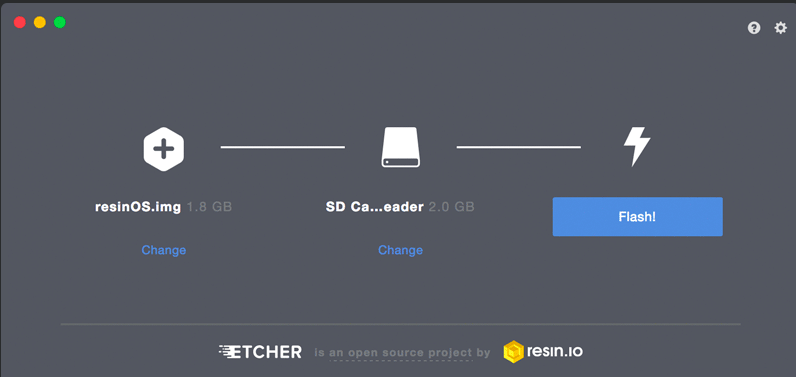
Then download a program called Etcher then insert an SD card and select the card, select the img file then burn it to your SD card.
You can now boot your Pi. I strongly recommend hooking up to ethernet first or booting with a monitor keyboard and mouse to select your wifi network. Yeah you can hand code the wpa_supplicant file but this is a tutorial for beginners.
NOTE: SSH is no longer automatically enabled on Raspbian. You can either turn it on by writing a file named ssh to the boot directory or you can enable it after you boot into the GUI by passing the command:
sudo raspi-config
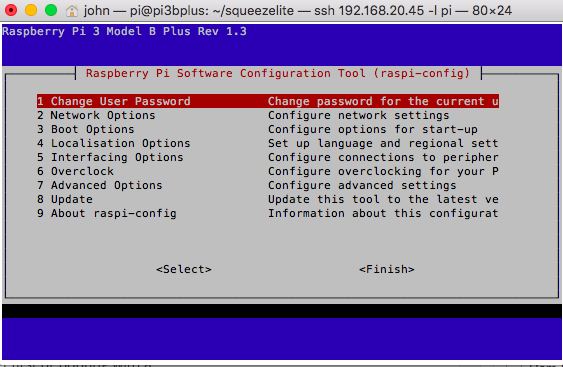
SSH is under number 5, Interfacing Options.
To add SSH after writing the SD card (I do this from a Mac terminal)
cd /Volumes
cd boot
touch ssh
exit
From Raspi config you can (and should) change your password, locale, time zone, hostname and turn on VNC and SSH.
Once you boot up select your wifi or just proceed if you are hooked to the internet.
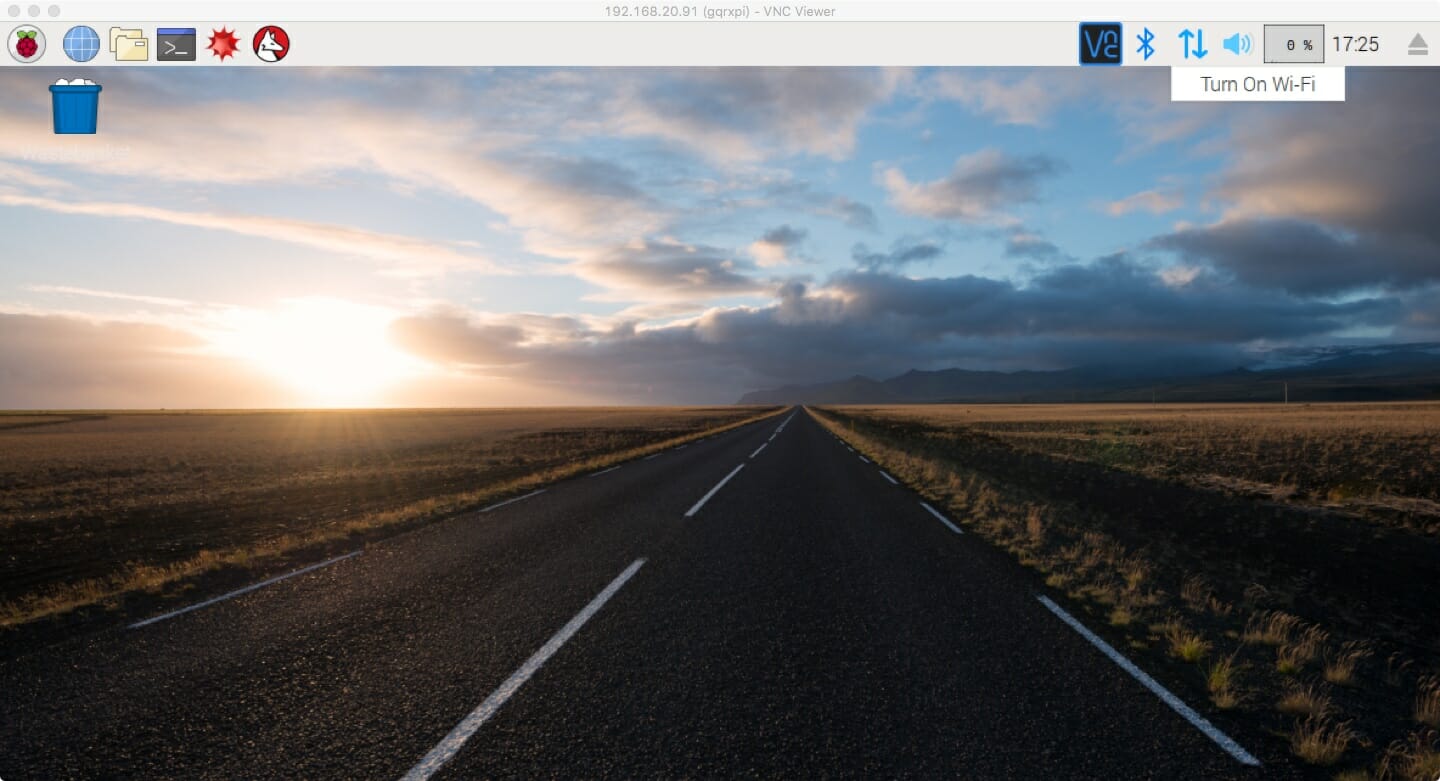
Turn WIFi on like below. Put the mouse over the up and down arrows on the toolbar. (Mine is connected to ethernet).
Once connected open terminal (the fourth icon from the left on the top toolbar that looks like a black terminal and type the following commands one at a time.
sudo apt-get update
sudo apt-get upgrade
Could take a few minutes. Once updated we’ll install LMS.
We’re going to install a music media server called Logitechmediaserver (LMS). It is available for a variety of platforms such as Windows, Linux, Mac, Raspberry Pi (ARM), and some NAS devices. My principal LMS server is installed on a Mac Mini. From there you go to mysqueezebox.com and make an account. Once you have an account you can add streaming services such as Spotify, Tidal, Pandora, TuneIn Radio, Shoutcast, among several others. Those are the ones I have used or currently use now.
Before putting LMS on the Pi add these dependencies first
sudo apt-get install libio-socket-ssl-perl libnet-libidn-perl libnet-ssleay-perl perl-openssl-defaults
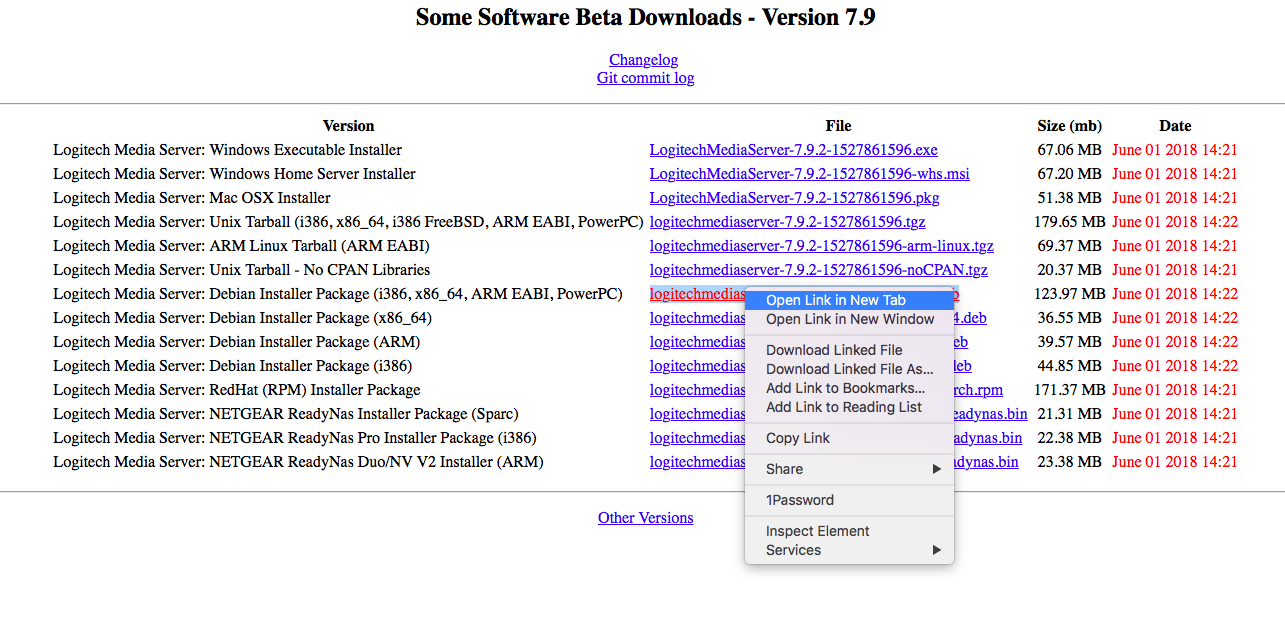
You don’t HAVE to put LMS on another computer. It will run on the same Pi, it may be a little slow on a Pi Zero but it’ll run. Runs real nice on a Pi 3. So if this is going to be a stand alone LMS lets do this. If you intend to install LMS on another computer you can skip this. I have directions below for just adding a squeezelite player. To install LMS go to the nightly link above and right click on the ARM version that says “all.deb” at the end of the file name and go to your terminal and type wget followed by the link (again using the latest version as of when I wrote this).
Now type (and make sure your file names are right, cut and paste with links is weird sometimes) They change the version numbers frequently. These file names and numbers will be different in a couple days. Adjust accordingly.
sudo apt intall squeezelite
The last command there will install LMS on directly on your Pi and it should start automatically. The way to access it is any browser on the same network with the IP address of your Pi plus :9000 (i.e. 192.168.1.2:9000) To find the address of your Pi type
ifconfig
Squeezelite is the player we need to actually play the content. Adding squeezelite is remarkably simple. I do it like this. It needs some dependencies though to play common file formats.
sudo apt-get install libasound2-dev libflac-dev libmad0-dev libvorbis-dev libfaad-dev libmpg123-dev liblircclient-dev libncurses5-dev
Then lets get and install squeezelite.
cd
mkdir squeezelite
cd squeezelite
Now go to this page to get the latest squeezelite. My tutorial will describe the current latest version. Simply change version number if it updates once this post gets dated a bit.
wget https://sourceforge.net/projects/lmsclients/files/squeezelite/linux/squeezelite-1.8.7.1053-armv6hf.tar.gz
tar -xzf squeezelite-1.8.7.1053-armv6hf.tar.gz

sudo mv squeezelite /usr/bin/squeezelite
Okay squeezelite is now installed. Simple.
Now lets see our devices. I’m using the HDMI sound off the TV here. You could add a DAC if you wanted to.
squeezelite -l
There is quite a bit of output for a Pi Zero. The following kind of depends on what kind of Pi you have in the project. I am using a Pi zero which has really only one audio output. The HDMI. I could have chosen the one that says “sys default”, the other “hw:” device works I know. Probably some others as well. If you are using a Pi 2 or Pi 3 you also have an onboard sound output which will be your sys default. To pipe sound out via your HDMI cable you pretty much have to use the one I have circled, or the plughw one below it two items. Yes you can use the sysdefault off the 1/8th inch output on the Pi but then you need another cable. Let’s keep it simple, shall we?
I chose to use the one circled because it is the hardware (hw:) device for the HDMI. . Now here’s what we do to set up the device and make it start at boot.
NOTE: IF NOT USING HDMI THEN USE THE ONE THAT STARTS WITH sysdefault, front, or hw.

sudo nano /etc/systemd/system/squeezelite.service
It’ll be empty. Paste this in (and note this is MY system), alter accordingly. After squeezelite -o add the player you selected. The -n parameter is the name of the player. Name it anything you want. The -s is the LMS server. If you leave this out entirely it will likely find it. If you want to put -s 127.0.0.1 that will work too. The -a 80:4 is something I used on another TV that sounded terrible and choppy until I added those parameters. To be honest I didn’t remove it on this new TV and it works great. I’m leaving it in. You may not need it or you might need it. Because I have like 10 players in the house sometimes they conflict with each other. The -m setting is the MAC address of the player to keep them all straight. If this is your only player you won’t even need to add the -m part.
MAKE SURE TO GET THE DEVICE AFTER THE dash O (- o) CORRECTLY FOR YOUR INSTALLATION.

[Unit]
Description=Squeezelite
After=network.target
[Service]
ExecStart=/usr/bin/squeezelite -o hw:CARD=ALSA,DEV=1 -n calendar -s 192.168.20.37 -a 80:4 -m 74:da:38:41:f8:9e
[Install]
WantedBy=multi-user.target
Hit CTL +x and then answer Y to save the file.
Now lets start it at boot
sudo systemctl enable squeezelite.service
Now if everything went according to plan when you boot up and find your LogitechMediaServer (it is the IP address of the computer you put it on plus :9000) In my case my LMS lives on my Mac Mini of 192.168.20.37:9000
Just put that in a browser and look for your -n parameter (I named mine calendar). It should find it as a player.

You can see I circled the apps I enabled in my squeezebox.com
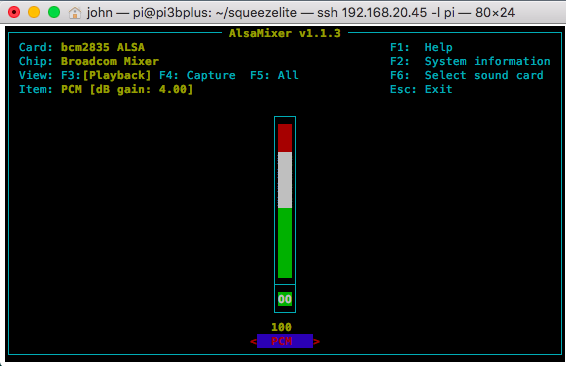
If you find the volume isn’t loud enough pass this command:
alsamixer
Select your device by following the on screen directions (usually function key + and f key) and then hold down shift and the + key on the keyboard until the volume goes up to max.
Spotify app is now called Spotty and must be added through the Settings > Plugins page.
Tidal and Spotify you must have pay premium accounts to use. Ditto with Pandora. TuneIn and Shoutcast are free.
When running squeezelite on a raspberry pi, the way to get rid of squeezelite client conflicts in the server is to select the raspi-config option to “boot after network”. If squeezelite boots up before the network is up it gets a zero mac address and ultimately sends it to the server, which, unfortunately, uses the mac address as a client id. If you have multiple raspberry pi clients (and I have three or four from time to time) all with zero mac addresses, it’s chaos. Set the “boot after network” option, and it all works fine.
Pingback: Raspberry Pi and LogitechMediaServer and Squeezelite | John’s Tech Blog – Links
Firstly, thanks very much for the tutorial. However, I have tried every possible version of the required download from the nightly site. They have all failed. I get the message that it has connected to the Logitech URL but then it shows error 404 not found. I am very unsure about the exact URL to type into PuTTy to perform the download for any particular version. What else do you change in the URL besides the version number?
correct link for wget command these days:
—————-
wget https://sourceforge.net/projects/lmsclients/files/squeezelite/linux/squeezelite-1.9.7.1270-armv6hf.tar.gz
—————-
(you need to remove the “/download” part at the end.)
Please update the site as it is useful.
Followed your Guide and it worked like a charm in August 2020.
@Godfrey
correct link for wget command these days:
—————-
wget https://sourceforge.net/projects/lmsclients/files/squeezelite/linux/squeezelite-1.9.7.1270-armv6hf.tar.gz
—————-
(you need to remove the “/download” part at the end.
All of this worked great on a Raspberry Pi 400. Thank you so much and I will bookmark this page with the hopes that it will still exist in case I need it again sometime in the future.
Salut et merci pour le tuto
J’utilise LMS depuis un an, il tourne sur un Raspberry pie 3 via Volumio. J’ai ajouté un nouveau lecteur (et cela m’en fait 4), et depuis j’ai des problèmes de synchronisation et coupure…..
J’ecoute principalement la musique depuis le plugin Spotty.
Je vois que tu as 10 lecteurs et que lmh est sur un Raspberry pi 0. Du coup pourquoi cela bug chez moi ?
I’ve got up to running this command
squeezelite -l
It shows a bunch of output devices but I have no idea what to do next as none of the pics from that point on display on this site.
works pretty nice. Only issue I have is volume, the volume control in the LMS interface is not working. But AlsaMixer does. No doubt I will fine tune things in time but it worksand that is cool. thx!
Hey there,
thanks for the tutorial! It’s one out of many I’ve had to combine to achieve what I want: A voice assistant for Home Assistant that doubles as a music_player, hence a device I can stream music to, on a rhaspberry 2 zero.
Unfortunately I seem to be running into a strange issue when installing the dependencies for Squeezelite:
When executing the command my SSL windows freezes showing there lines:
“Building module:
Cleaning build area…
make -j4 KERNELRELEASE=6.6.47+rpt-rpi-v8 -C /lib/modules/6.6.47+rpt-rpi-v8/build M=/var/lib/dkms/seeed-voicecard/0.3/build……..”
No progress anymore, even after an hour.
Can anyone point me into a good direction here? I’ve never seen a simple install corrupt and freeze any one my pies.
Kudos!