
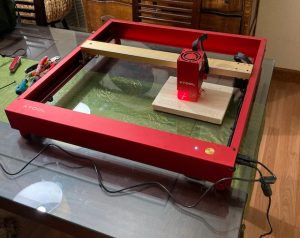
xTool D1 Pro
FULL DISCLOSURE – I was contacted by xTool and provided this xTool D1 Pro Kit to review. This is just an initial impression following my build out, with a further, more in-depth review to follow soon.
XTool D1 Pro
My laser is the 20 watt version with the RA2 Rotary. It has an impressive working area size of 430 x 390 mm (16.93 x 15.35 inches). The published Z height is 50 mm (2 inches). I suppose they had to put some number there but the reality is you can laser an item of just about any height if you raise the laser with the included riser legs or 3D print legs or stack soup cans under the legs. The Z height can be just about anything.
As usual I won’t spend time with videos showing the unboxing or reposting things you can find on their product information page. If you are looking at this blog and have an interest in getting an xTool D1 Pro you’ve already looked at their page and me re-hashing a picture of the box and listing the specifications (other than the ones I listed just above) is simply redundant and a waste of your time. Here on my blog I get something, use it, sometimes in ways it wasn’t meant to be used, and then tell you what I think.
The first thing I want to say about ANY LASER is that you probably think you’ll buy one and start whipping out crafty things and soon become a millionaire, or at least be the talk of the town. Some of you might. But most people that buy them have no laser experience, no experience with other items that travel along an X, Y, and Z axis. They also have limited graphic arts abilities, and minimal abilities to repair malfunctioning electronics. I basically just described myself at one time, so don’t take that personally.
But I will say this before I start my review. If you buy ONE machine to run a business, that is a business model designed for failure. If you are in business you need to plan for downtimes. That may include owning TWO machines, or having a kit of repair parts. It might even involve having two computers in case one fails. Lasers are electrical, mechanical, and optical devices that can break. Diode lasers degrade over time. All I am saying is don’t buy one machine, and then run that machine to failure and then declare it to be junk when you have orders you can’t fulfill. Rant complete.
On with the build and review!
BUILD
Build time was less than an hour watching this excellent video on YouTube.
[kad_youtube url=”https://www.youtube.com/watch?v=GClWZg7JR1s” ]
The video moves rather quickly though so prepare to hit the pause button a whole lot. But all in all if you follow it you can’t go wrong.
I did note a few things during build. Attaching the white, yellow, and red connectors to the main control board was a bit tougher than I thought it should have been. There isn’t much room to mess around with, especially if you have large hands. It took me longer than I thought it should have. And I was scared I was going to break something. It might be a benefit for xTool to trim down the area I depicted in the picture below to allow straight in access to the connectors. However, if that area has better access it also isn’t protected as well. Not sure which way is better but I do know it was difficult to install these connectors.
Control board connectors (click pics to enlarge)


The other end of those cables has some weird routing I think. I feel like there is a fairly sufficient amount of bending and cable strain on the other end. I’ll have to keep my eye on this.
Possible Wire Strain Point (click pics to enlarge)


Lastly the Air Assist nozzle inlet port wasn’t PERFECTLY centered between the plexiglass shield and while I was able to screw it in it wasn’t super easy. I had to kind of maneuver it right on the edge of the plexiglass. I know it was meant to be a little better centered than that.
Adding Air Assist Nozzle (click pic to enlarge)

Here’s something good about the build. They toss in an extra screw or two in the kit. That is huge! How many times have you dropped a sub-atomic sized screw that HAD TO BE FOUND before you could move on. Having an extra screw or two and an extra zip tie or two can really save the day. They also give you a decent screwdriver with the proper sized driver to build the kit. Despite me owning a zillion dollars worth of tools I couldn’t find a bit that size to use in one of my mega-buck ratcheting screwdrivers. The included tool is perfect for the job.
POST BUILD
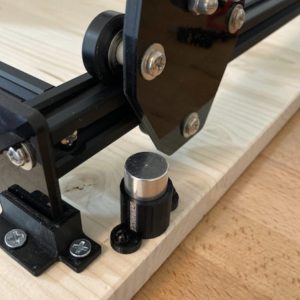
After building the D1 Pro and before hooking it up I paused to simply look at it and think about the design. Thing number one I noticed is that the focus mechanism is BUILT IN to the laser head. On my Ortur they give you a separate focus block that I think tons of people simply lose or even throw away because they aren’t sure what it is.
Ortur Focus Block
This is the Ortur Laser Master 2 Focus Block. I ended up designing a 3D printed holder so I wouldn’t lose or misplace it.
xTool adding a built in focus mechanism to their D1 Pro is GENIUS.
Focus Mechanism (click pic to enlarge)

Thing number 2 is that they add an air assist air port and the very top of the laser head has a feed through for the tubing. SHEER GENIUS move number two! On my Ortur laser you have to 3D print stuff and disassemble and reassemble stuff to get a decent air assist built. xTool has really given this some thought.
Air Assist Tube Routing (click pics to enlarge)


Thing number 3 is just the rigidity of the frame. It’s not some slapped together channel pieces where you fumble with T nuts. You build the whole thing and then realize you left a T nut out or something. Everything is just very well designed. This xTool D1 Pro is way more evolved than my Ortur Laser Master 2. In fact the xTool D1 Pro has improved everything I don’t like on my Ortur Laser. Not to mention it is considerably more powerful. We’ll test that power later.
While researching the laser while it was in the mail I was surprised to see that xTool also has control software named xTool Creative Space available for download.
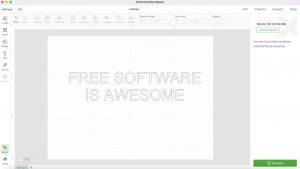
xTool Creative Space
I am an avid user of Lightburn and strongly recommend it however lots of users prefer using free software.
Once you purchase Lightburn it is forever yours, however if an update occurs after 12 months you have to buy an upgrade license. Lots of people are no fan of that software business model.
While I can tell right away that Lightburn is way more feature rich than Creative Space, I can also tell that Creative Space can do A LOT. And I’d be willing to bet that most users would find it to be enough of a software package and be happy to NOT pay for annual updates.
I’d also be willing to bet the xTool Creative Space software will improve over time. Bonus points for them providing a Mac version. A Linux version would be cool though too.
After connecting to XCS software I checked for a firmware update and was told a new firmware was available. The update went smoothly with no problems.
Firmware Update (click pics to enlarge)


While this isn’t a very polished video, I grabbed my cell phone and recorded my first attempted burn to capture what happened. I feel it is important to record the first time you turn something on after you build it to see if it works or to see if it goes POOF! Also to see if it burned where I told it to burn or if the X and Y axis would go nuts. I’ve had that happen on other lasers and 3D printers. Everything worked perfectly. Way to go xTool!
[kad_youtube url=”https://youtu.be/H5qgwAPzoE4″ ]
I’d be remiss in not talking about REPOSITIONING ACCURACY at this point. You can’t imagine how frustrating it is to burn something as I did in the video above and then say “I’ll run it again to darken it up” and then when the 2nd pass starts IT IS OFF A LITTLE BIT and ends up ruining your work. When I ran the word “test” a 2nd time it was DEAD ON ACCURATE. You won’t always get that with other machines. They’ll be close, but you’ll see a double burn. The xTool handled this PERFECTLY. Getting accuracy like this is a combination of frame rigidity, proper belt tension, and a well designed laser module.
MY CONCLUSIONS AND FIRST IMPRESSIONS
- This is an impressive laser with exceptional build quality.
- The kit is easy to build with a minor thing or two noted.
- All tools and cables you need to get going are provided.
- Free software is available.
- The first test run did exactly what I expected it to do.
- The xTool D1 Pro is everything that my Ortur Laser Master 2 is not. I’ve used the Laser Master 2 with great success and I’m not knocking it, but the D1 Pro is an improvement in almost every way.
- From a safety standpoint (which I didn’t talk about above) I love the plexiglass shield built in and they provide a pair of laser safety goggles.
- The addition of a built in focus mechanism and air assist tubing nozzle is HUGE! My Ortur is Frankenstein’d with 3D printed parts (that MELT) to achieve the same thing. Anyone that has ever rigged up an air assist on a laser knows what I’m talking about here.
I would say initially that this is a solid machine but STAND BY MY EARLIER STATEMENTS that if you buy one machine with no spare parts to run a business then you need to re-examine your business model. If you can afford it………get two of these things. I did a quick check on the web site and did not see a motherboard for sale but did see they provide a video showing how to replace it. I’ll do a little deeper digging on this later. At a minimum, if I were in business, I would want a main board, a limit switch, and another laser head in my spare parts kit………but that’s just me.
Looking at the site I see that a 20 watt laser head is $599 and a 10 watt laser head is $399. I can’t confirm if that is applicable to the D1 Pro or not as it just says D1. Assuming a D1 Pro laser might cost a little more I really feel like it would be as economical to buy a second machine (for a business user that can’t afford downtime). If you own a 20 watt, maybe buy a 10 watt machine for a backup. Ultimately it depends on what you are making, I guess but with no secondary machine or spare parts you will be down for at least several days or more waiting on repair parts. And hopefully you are tech savvy enough to replace those parts. If you aren’t you really do need a backup machine.
My initial impressions are that this laser is a Home Run. But we need to put it through its paces. Stand by for more information later after I’ve used and abused it some.