
Home Networking Upgrades
This has been a lot of years coming. I’m certainly no home networking guru or sys admin, but I’ve always been a step or three ahead of the common home network setup. I have about 65 Internet of Things (IoT) devices and home automation. In my mind “automation” is the operative word. Push my doorbell, I get a text. Garage door opens, I get a text. Motion happens in an empty house, I get a text. Lights come on at sunset. .
You need a fairly robust network backing all this hardware up and MOST IMPORTANTLY you need to segregate all those IoT devices from the computers that hold your precious, personal, private data. I bought a cheap outlet to tie into my home automation. The person that did the initial hack claimed the device was transmitting data back to some server in China. Just for fun before I hacked the outlet I put it on the network and began watching the data packets flow to and from the device. Sure enough, it was communicating with a computer somewhere in China. I’m sorry, but no device in my home should be communicating with a computer offshore, unless I tell it to.
Your cameras, your IoT devices, and your other internet enabled toys should not be on the same network as your personal data.
Why Am I Doing This?
Speed and Security. I have upgraded from 1 Gbps ethernet speed to 2.5 Gbps. I want my personal computers and servers to be able to sync files more quickly.
There are 65 devices that pull an IP address on my local network. As I mentioned before, most of those devices are IoT devices. Quite frankly, Alexa, or a security camera have no business being on the same network as my personal computer. Here are the things I want on a PRIVATE network:
- Personal Computers
- Phones
- iPads
- HomeLab Server
- Network Attached Storage – NAS
Hardware Required
Just about anyone can do this. All you REALLY need is a router that has the ability to segregate the ethernet ports. This can usually be done via something called a Virtual Lan (VLAN). Then you can set it up so VLAN 1 can see VLAN 2, but VLAN 2 cannot see VLAN 1. It’s really pretty simple. You can even create a pretty robust network with a minimal amount of hardware such as I’ve done here.
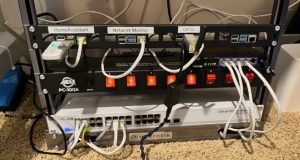
Server Rack
In my case, I’m using two managed network switches. A managed switch allows you to tag ports and set individual VLAN’s. You can set port 2 to carry VLAN 50 and port 3 to carry VLAN 60 traffic.
The white one on the bottom is an inexpensive switch that will carry my IoT network. It has a max speed of 1 Gbps.
There is a smaller 5 port switch that is 2.5 Gbps and it will carry my private network. Basically, it has a WiFi router, a server, and my personal computers hooked to it. 2.5 GB switches are EXPENSIVE so I’m keeping it as small as I can. I don’t own many 2.5 GB pieces of hardware anyway.
Lastly there is a rack that holds 4 Raspberry Pi’s. Each Pi has a mission. One runs HomeAssistant which runs the home automation. Another Pi is a Network Monitor and the one marked OP25 is a Police Scanner which decodes P25 Phase 1 and 2 digital transmissions. It is super cool! Pi number 4 doesn’t have a job. Yet.
VLAN’s
It’s a simple concept. Put all private computers on one VLAN network and put all the questionable crap on a separate VLAN. For example:
- 192.168.50.1 can be private
- 192.168.60.1 can be IoT devices
Then a couple of simple firewall rules let me, the system administrator, segregate the networks. If I am on network VLAN 50 I can access everything on 60. But nothing on 60 can see anything on 50. 50 does not exist as far as 60 is concerned. In this way we can be sure that the light bulb from China isn’t harvesting data from YOUR PRIVATE NETWORK.
In Conclusion
It is smart to have a hardware firewall. And it is even smarter to keep your private files out of reach from devices that are lacking in security. How many times have you heard about cameras and microphones being hacked?
I might run a blog that is a little more specific and in fact I drew a network map and then realized that posting it probably isn’t a great idea. It shows my whole network layout and IP ranges I use. When I use an example of 192.168.50.1 as I did above, rest assured my actual subnets are different.
The first thing someone probing your network does is to test 192.168.1.1 which is default for most network and wifi routers. If you just plug your gear in and not change anything a hacker knows to look at 192.168.1.1 and then they’ll try default passwords. Believe it or not most routers have a password of either admin or password. I’m not kidding.
No real advantage to writing about security and then showing everyone exactly how my network is designed.