
Sculpfun S9 Review
I was recently contacted by Sculpfun and provided a Sculpfun S9 laser to review.
I have owned multiple desktop lasers since they first became mainstream around 2019. Fast forward 5 years and desktop lasers are gaining in popularity. The laser side hustle is a real phenomenon and seemingly getting stronger all the time. Despite the many choices in desktop lasers, they are all fairly similar.
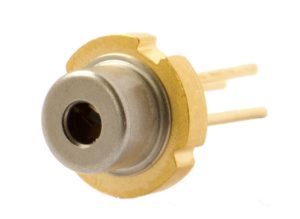
Typical 450nm diode module
Most machines contain a 450 nanometer (nm), 5 watt blue laser diode. That is roughly the most powerful diode on the market. Manufacturers who have 10 watt, or 20 watt optical output simply combine multiple diodes into one beam. A 10 watt laser has 2 diodes, and a 20 watt laser has 4 diodes, and so on.
Similarly, most of these devices have a rectangular frame somewhere around 350 to 400 mm in length and width. The laser head is driven by an 8 bit or 32 bit motherboard and stepper motors, and the laser is manually focused.
Since the machines are all so similar, the thing that sets them apart is cost. Many desktop diode laser offerings come in around the $500 price point. Lasers that cost less than that price point are a little tougher to find.
Enter the Sculpfun S9 at the current price of $269.99. And as a bonus, Sculpfun has provided my readers a 7% off discount code only for the S9. KJKXP7 (S9). By my calculations that makes the laser approximately $251.09. I have done blogs on budget lasers and $250 is an EXCELLENT entry level price point.
Sculpfun S9 Specs
These are the basic specs that matter to me:
- 5.5 watt optical output
- Beam width = 0.06mm
- 400×410 mm advertised working area
- Open frame design
- GRBL language compatible with Lightburn software
What You Don’t Get
At this price point the S9 does not have limit switches. The only downside to NOT having limit switches is that the laser will not automatically return to the home position. It will have to be moved manually. After using lasers with limit switches you may feel spoiled to have a machine that auto homes. In my opinion, manually positioning your laser is a lot like manually focusing a camera. In the right hands that is a FEATURE, and not a deficiency. Sculpfun does sell a limit switch kit for $27.99 so if you think you can’t live without limit switches you can add them later for a small price. There are other budget lasers out there that technically can have limit switches added but it is purely a DIY mess to incorporate. Not so with the Sculpfun S9. The limit switch kit is clean and professional looking.
It also does not come with software, but this is common with most desktop diode lasers. LaserGRBL is Windows only and free to download. Most users will want to use the de facto standard software which is Lightburn. Lightburn is a pay program ($60) and is cross platform (Windows, Mac, Linux).
Unboxing And Assembly
I received my laser in about 7 days and it seemed to have shipped from Commerce, CA. The laser was well packaged and undamaged. The manual lays out the process in steps and the hardware bags are marked for each step. IT COULD NOT BE EASIER. And they send a bag of spare hardware.
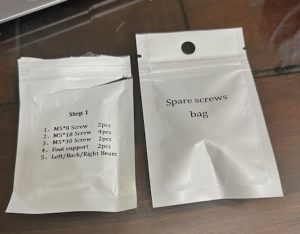
Hardware bags
Assembly took me about 30 minutes but I was going slow and taking photos. I probably could have built it in 20 minutes if I was just building it for myself.
What I Like
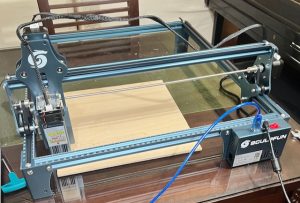
Assembled
The frame is solid and is attractive and appears to be a blue anodized surface. That’s a nice departure from brushed aluminum or matte black like so many other lasers.
Fit and finish is excellent The open frame construction provides good clearance for allowing items larger than the laser to be positioned or passed through the frame.
Z axis (up and down) travel of the laser head is way more than other lasers in its class and it has 2 set screws for securing the laser head in place for focusing.
The X0 and Y0 grid marks align PERFECTLY indicating great design attention to detail.
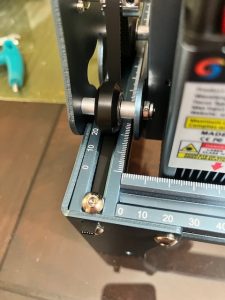
Grid Markings
I did have to do some adjusting of the eccentric nuts on both sides of the X frame rail and on the laser head plate. These adjustments were very minor and no problem for an old pro like myself but could be mildly confusing to a new laser user. The adjustments really improved the accuracy of the laser.
What I Don’t Like
As is common with lasers of this class there is little to no cable management. The cables are just out there in the open and just long enough to get into the laser area if you aren’t careful.
The X and Y movements are done with rubber wheels which means the X frame rail is insulated and isolated from the frame. Other lasers with similar construction have had grounding and bonding issues with this type of design. That being said I have not read of any Sculpfun failures because of this design.
Finally, there are no limit switches as I discussed earlier.
How Does It Shake Out
Given my likes and dislikes, I’d say the Likes outweigh the Dislikes. This is a budget laser and at its $250 price point it is amazing for what it is. Even if you own the fanciest, most expensive laser there is, your business is kaput if the laser breaks. I firmly believe every laser operator should own a backup machine (or spare parts). At $250 you cannot go wrong owning this as an entry level machine or as a backup machine for your business.
First Burn
Well, the First Burn video you are going to see was actually my 2nd take. In my haste to build the machine and turn it on I neglected to add the rubber pads to the bottom of the legs. Coupled with the fact my first burn was on a glass topped table the machine walked all over the place and my 1st burn of the word “TEST” was all over the place and had squiggly lines. Once I secured the machine AND THE PIECE I WAS ENGRAVING, the laser quality was EXCELLENT.
Repositional Accuracy is when you go back and add a 2nd or 3rd pass after completing the initial pass. Obviously, you want subsequent passes to land exactly where the first pass did. So far I am realizing excellent repositional accuracy with the Sculpfun S9.
Anyway, here is a video of my first operational test of the laser.
[kad_youtube url=”https://youtu.be/rdr9vFtneQ8″ ]
From build to successful first burn in about 35 minutes. That makes this machine an excellent choice for prospective new laser buyer or for an old hat having a secondary machine for a backup
Working Area Size
Is the working area 400mm x 410mm? I’ve seen some people say that it isn’t. There is really only one way to test that. Draw a rectangle that is 400mm x 410mm and frame it. And that is just what I did below. I can confirm the working area is what they say it is, what the GRBL code says it is, and what I say it is. Here is proof.
[kad_youtube url=”https://youtu.be/rEmH9bpkwdM” ]
I’ll make a grid for this laser later as I get further into testing that will prove again the perimeter of the working area will burn the advertised size.
Summary (So Far)
I built it. I tested it. And I confirmed a few things. I’ll stop this blog entry here and spend the next week or so testing it a bit more extensively. Expect a more extensive blog entry in about a week or so. Here is my initial impression:
The Sculpfun S9 is an excellent bargain and a solid machine at the price point of roughly $250. It is easy to assemble, has a solid, attractive frame and works as advertised. Any new user should be comfortable cutting their teeth on this machine.
Thanks for answering what did and didn’t come included with S9 machine.
I’m looking to buy online, from Shopee.com.ph and items needed such as which laptop, controler, software is a real question.
Is it possible to etch glass or brass with this machine? I’ve got a 10w machine that needs a bit more horsepower but I’m kinda stumped on where this “90w” realistically falls on the “can etch” list of stuff.