
xTool F1 Review – First Impressions
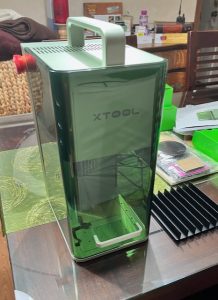
xTool F1
My friends at xTool have provided me with one of their latest offerings to review, the xTool F1. The F1 is a highly portable laser engraver which contains 2 separate lasers in one housing. One laser is a 10 watt, 455 nanometer (nm) wavelength laser and the second is a 2 watt IR, 1064 nm laser for marking metals.
The laser is a galvo system and an explanation of that type of laser can be found here. I’m told the author of that article is pretty awesome!
Because the galvo laser uses a mirror system instead of mechanical movements across an X and Y axis, it typically is a LOT faster than a conventional desktop diode laser.
Conversely, the tradeoff here is that the range of the mirroring system results in a considerably smaller useable area. Also if cutting an item, the edges may have a slight bevel to them. This is due of the angle of the laser cutting beam.
Where the F1 really shines brightly is its ability to mark small items quickly. Items such as jewelry, coasters, leather patches, and tumblers (with optional rotary) can be rapidly produced. Because of the portability of the F1 it is ideal for Craft Show and Flea Market sales. Customers may walk away if you tell them their tumbler will be ready for pickup in 30 minutes. However, if you tell them you can produce it in a minute or two right in front of their eyes, they are more inclined to stick around. Time is money, as they say.
First Impressions
The F1 packaging is for lack of a better word, OUTSTANDING. I feel like I bought something from Apple Computer. It’s that good.
xTool F1 Packaging (click pics to enlarge)


I do want to note one thing here. If you own the RA2 Rotary Pro it will work with the xTool F1, however it needs a specific cable. The cable does not come included with either the F1 or the RA2 Rotary Pro. xTool does have a specific kit that contains both the rotary and the cable. Anyway, if you intend to use your rotary device be sure and order the cable when you order your F1.
Setup
Setup takes just a few moments. Remove all tape and packaging materials and be sure and remove the lens cover. After that it is just a matter of plugging in mains power and connecting to your laptop or computer. While a great portion of laser operators use Lightburn software, I strongly recommend using the xTool free XCS software. At some point you may transition to Lightburn however for getting started you’ll want XCS. It is so specific to the F1 and all of its bells and whistles are accessible and controllable in the xTool software.
You will want to use XCS for the excellent framing features it provides and for autofocusing operations. The library of materials selection in the software is pretty darn inclusive as well. A real time saver.
Before you get started, I recommend checking the firmware and updating if necessary. Mine came with the latest firmware installed.
There essentially is no assembly required. I can’t stress enough how great it is to pull a laser out of a box and not have to build it. As someone who frequents a lot of different laser forums I can tell you that a lot of user issues are a direct result of an assembly error.
Computer Connections
The F1 connects via its USB-C port on the right side of the laser, and the other connection is a standard USB A connector which goes to your computer. In my opinion this cable is not long enough, however, I am probably the exception here. I want to set my F1 a few feet away from my Mac Mini at home.
In a Craft Fair scenario the included USB cable is plenty long enough as your laptop is probably going to be sitting right next to the F1 anyway.
The F1 can also be connected wirelessly per these instructions. I set my wifi up and can confirm that it works fine.
Regarding wifi security I confirmed that while there is a Telnet and FTP connection available they are password protected. For comparisons sake I have an Ortur Laser Master 3 which has a wide open Telnet and FTP server with no security. Using Wifi on the Ortur is a MASSIVE SECURITY RISK. xTool shines here by locking those connections down.
Power Requirements
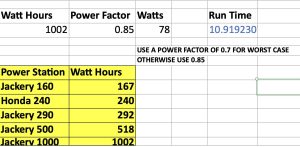
Because of the portability of F1 you might want to run it off of a portable power supply such as a Jackery. Power consumption looks like this to me:
- 10 watt diode laser @ 40% – consumed about 78 watts while engraving.
- 2 watt IR laser @ 100% – consumed about 70 watts while engraving.
My handy, dandy spreadsheet I made says that under both scenarios on my Jackery 1000 watt portable power supply that I would get nearly 11 hours of run time. Obviously if I run the 10 watt laser at a higher output I’ll consume more wattage but I think I’d still get over 8 hours of solid run time.
Good Run Times
Focus
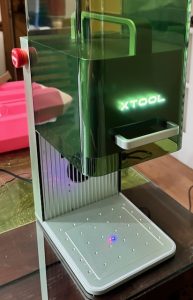 The F1 can be focused either automatically or manually. Initially I thought mine was out of focus as per the pic below. However, if I hit the “Focus Init” button in XCS the dots overlap.
Then if I input the correct material thickness in XCS I get a perfect autofocus. For my money manual focusing is faster and easier than working inside of the software.
Your mileage may vary. If you find yours really is out of alignment it is easy enough to correct this autofocusing alignment issue by following the steps found here.
Basically, you just stick a screwdriver in a hole near the lens, not to turn a screw but for leverage to manually calibrate the dots. This must be done after the autofocus init button is pushed and it runs though its routine. Once the dots are aligned it will forever be correct.
Testing
First Engraving
Within minutes of pulling the F1 out of the box I was ready to laser something.
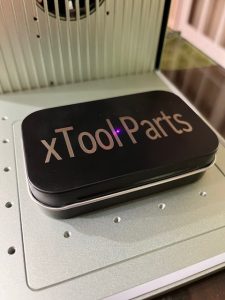
Years ago I bought these generic Altoids boxes with the intention of lasering whatever the contents were and organizing them in stackable shelves.
Only problem was that my diode lasers simply couldn’t etch through the thick anodized coating.
No such issue for the F1 2 watt IR laser. It made beautiful, legible markings in a couple of minutes.
Wish I would have used the xTool font for appearances sake however, I was red hot to engrave something with my new F1 and didn’t have time to design anything. I just threw some text down. Still it turned out really nice and crisp.
Additional Items
Next on the docket was a business card. The F1 kit contains a small materials kit with several blank cards. I designed something super quick in XCS and let ‘er rip. Magic.
[kad_youtube url=”https://youtu.be/bA1FZV0zU-c” ]
And with the L bracket installed once I get everything aligned in software I can then mass produce the cards by setting them in one after the other.
Coaster Coaster…….OOOOOF LOOOOOVE
Twenty Nine seconds, yep, two nine seconds for a US Navy logo on a 4×4″ coaster. I used the blue diode (10 watt) for this one.
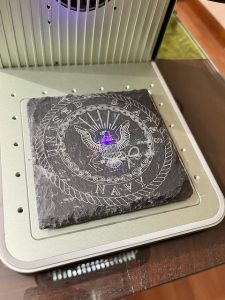
29 seconds
I’ll continue to play with this more and will follow this blog entry up with another one after I have some more time and experience with the machine.
Conclusions
xTool has hit a home run with the F1. This is the perfect laser for Craft Fair and Flea Market vendors. Its dual laser galvo system can etch or cut on a whole slew of materials and can do it pretty darn fast as well. Way faster than a diode laser.
It is lightweight, portable, and has a very moderate power consumption just right for a day of engraving with a portable power supply if your table does not have AC power provided.
Framing is almost Sailor and Marine proof (a military term that implies ease). Actually it implies that a Sailor or Marine won’t screw it up or break it, but I was trying to be nice. The frame box and outline make it easy to see exactly where the action is taking place on your item.
The kit contains just enough practice materials to get your feet wet.
The machine is relatively quiet but does have some fan noise.
Follow Up
xTool has also sent me a Slide Extension for the F1 which I have not received yet. I’ll include it in a follow up review that I have planned a week or two down the road. Hopefully, I’ll have some more knowledge and will have picked up some cool tricks or hacks by then.
This is very useful info for anyone hust starting out in the laser world….thank you for sharing
Pingback: xTool F1 Slide Extension - John's Tech Blog
Pingback: xTool F1 Slide Extension - THE LASER OG BLOG
Pingback: xTool F1 Review And Thoughts - John's Tech Blog
Do you know how much power the air filter needs? I want to make sure my jackery covers it.