In my quest for the perfect low voltage or dry contact garage door relay I stumbled across this one that I found on Amazon
Seems like it might have been made by ITead because it came programmed with EWELink software. Having said that I cannot find it on their website and I also thought it might be a Sonoff brand name. I still think it is ITead but I just can’t prove it.
I also searched the Tasmota Wiki for it and came up short. Looks like if I want to hack this switch that I’m on my own. I did play around with the EWELink software and to put it mildly…….it’s crap. It came with no instructions although I did manage to figure out how to get it into AP mode to connect to the EWELink.
This thing is screaming for custom software. So let’s explore that, shall we? First of all it looks like about all the other boards out there and it has an ITead PSF-B04 , ESP8285 Internet of Things (IoT) chip onboard. Now at least I know I can flash it, I just don’t know what’s going to happen after that. And by that I mean………is it supported by Tasmota? It’s only a $10 gamble so what the hell?
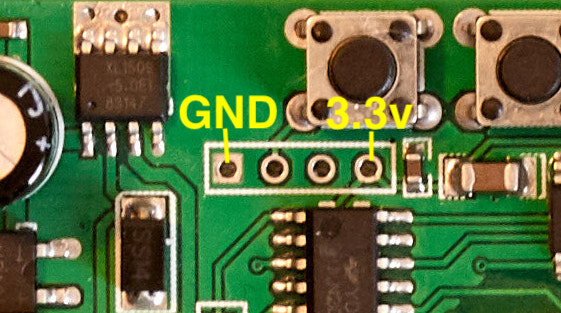
Most of these boards have a 4 pin connector where you can hook an FTDI up and flash the board. I confirmed that by plugging in a USB micro connector to the board that 3.3 volts was present across the pins in the photo.
So that’s good news as well. I did NOT map the pins in the middle which should be TX and RX however it didn’t look like there were any traces on the board to those pins. Who knows?
What I did do was find the specs for the PSF-B04 chip which show where TX and RX are.
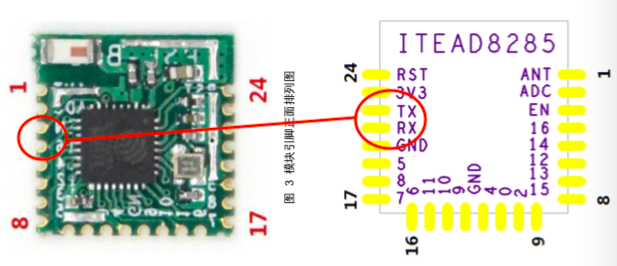
Simple Enough. Plug in your FTDI and just hold the breadboard pins directly on the chip. If I can do it with 56 year old eyes……so can you.
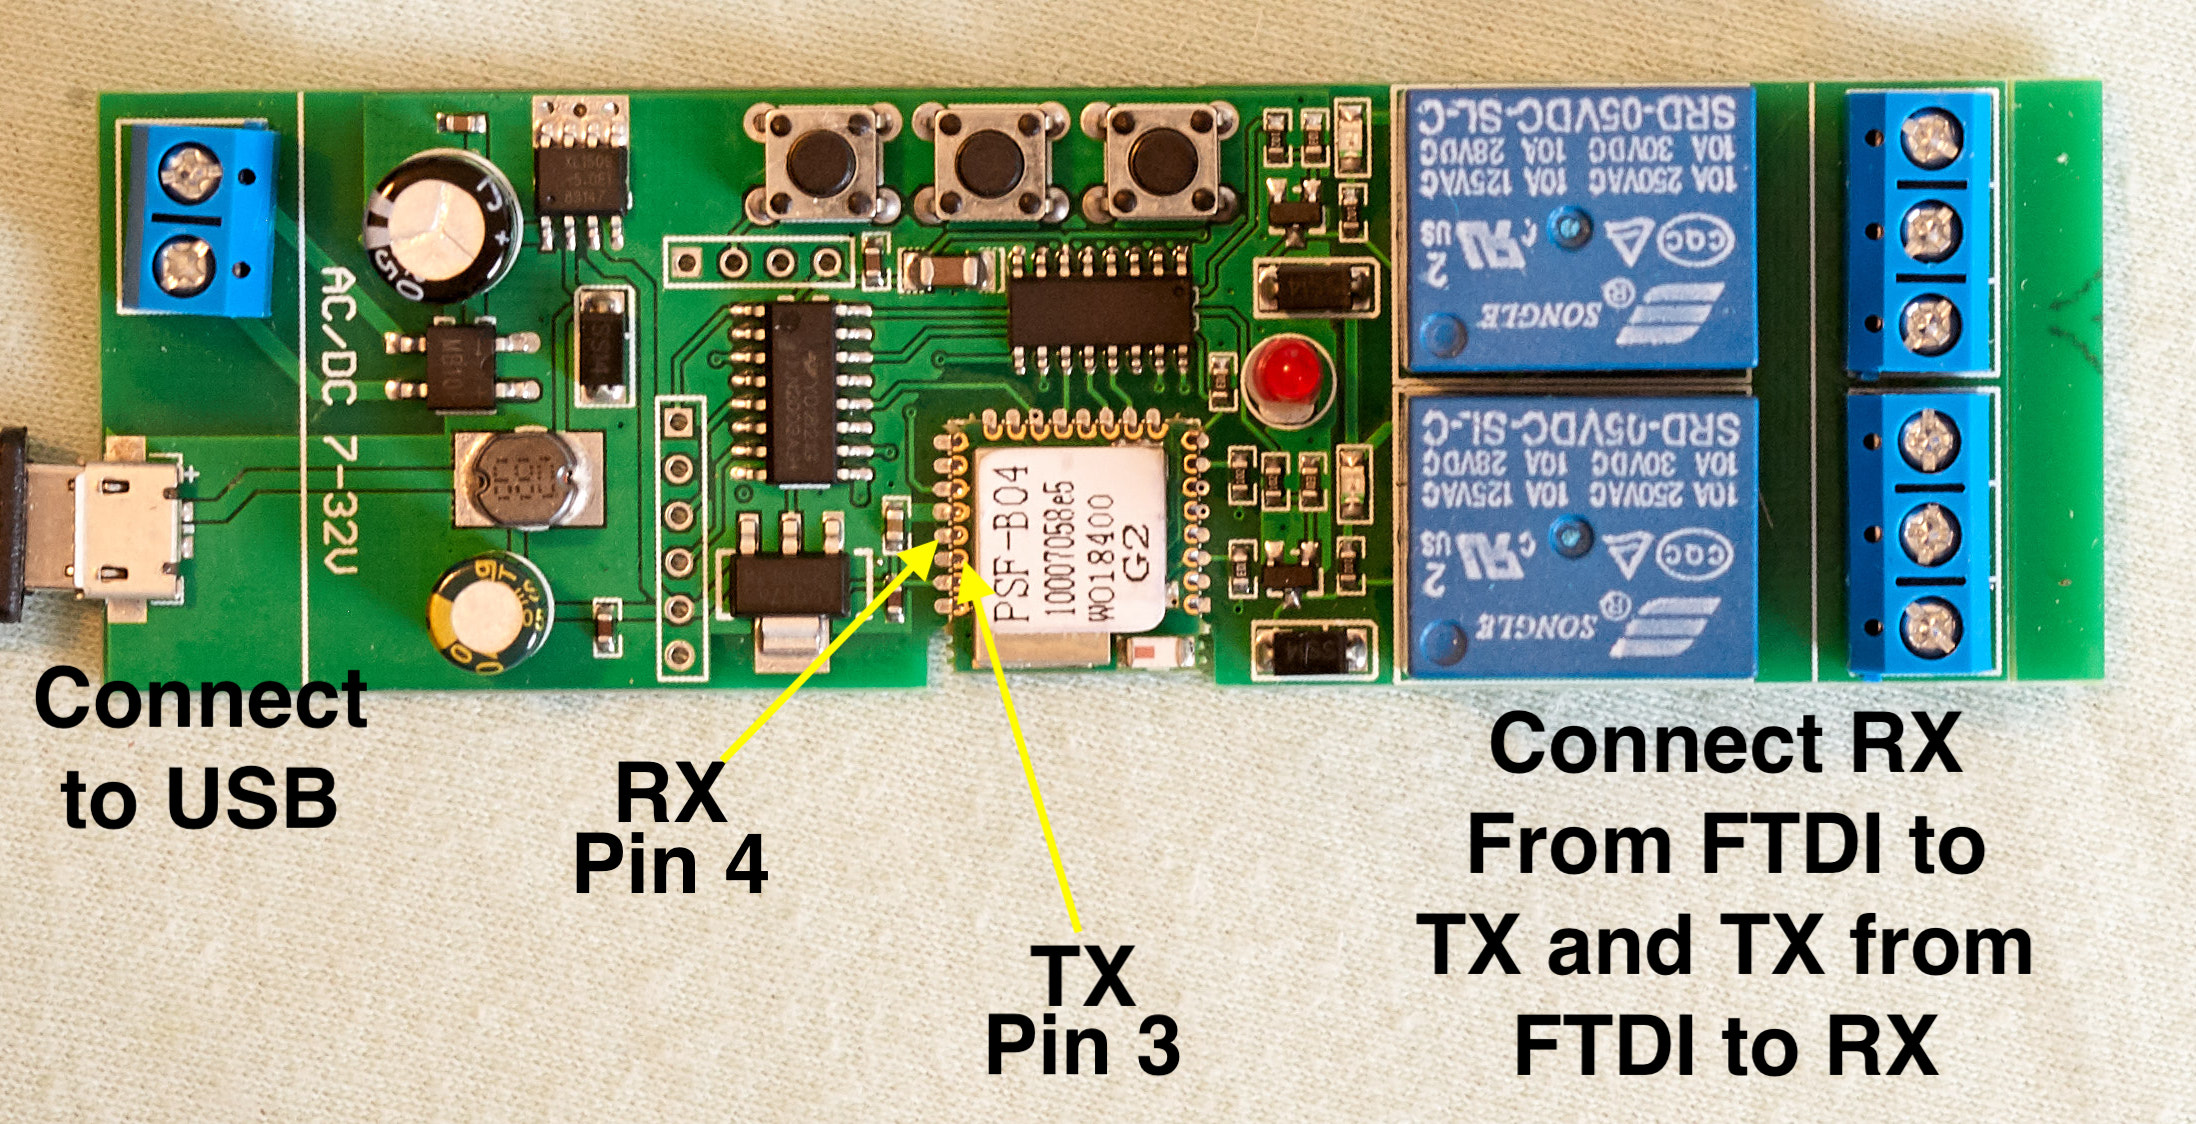
I’m not 100% positive how I got into flash mode but it seemed to be like this. The button closest to the power hook up end sets whether the relay is in inching mode, latched, etc. Set it in latched where when the relay is toggled it stays on. Now unplug. Hold down the button next to the relays, plug in the board and continue holding the button for 5 seconds. Both LED’s will be lit up. I believe that’s it.
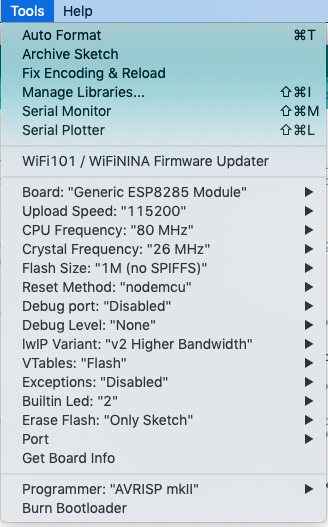
Download the Source Code.zip file from Tasmota releases (gotta scroll way down the page to find it) and navigate to the Sonoff folder and open the sonoff.ino file with ArduinoIDE. Make sure install the libraries (I’m not going into that here, I have those directions on this page). Once sonoff.ino is open then make sure at a minimum to go to the my_user_config.h tab and input your SSID and WiFi password so you can connect to it. I like to set a static IP up as well so I know where to find it by putting the IP address into a browser.
Set these parameters up in ArduinoIDE
Now compile and upload the sketch to the ESP8285 on the board by holding RX from the FTDI onto TX (pin 3) on the chip itself. Then hold TX from the FTDI on RX (pin 4) on the chip. You have to hold steady for a minute or so…..so get comfortable.
Hit “Upload” in ArduinoIDE and it will take a couple moments for the sketch to verify and begin the upload process. You have plenty of time to get those 2 pins into place and hold them onto the chip itself.
Again, if I can do this, anyone can. Okay it is flashed. It will come up as a Sonoff basic. The first thing you want to do is change the module to a Sonoff 4 Channel Pro. Hit the configuration button and select Sonoff 4CH PRO (23)
That’s right. I said a 4 channel pro. Remember earlier I said this was unsupported by Tasmota. Well guess what? The Toggle 1 and Toggle 2 work PERFECTLY with the relay. Toggle 3 and 4 will toggle the LED on the board. And the buttons on the board still work as well!
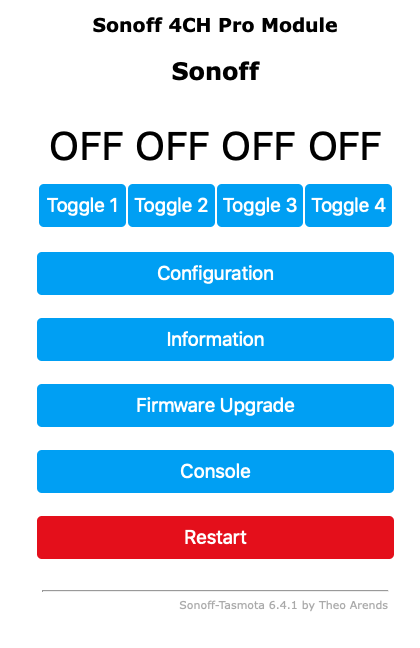
Now go to the Console and issue these commands:
PulseTime 10
PulseTime2 10
PowerRetain 1
Okay essentially this relay is set up. I intend to control this relay via MQTT in HomeAssistant so I went to Configuration > Configure MQTT and set the Host parameter with the IP address of my MQTT server.
Now we can light the relay up by issuing the commands to turn on Relay 1 and Relay 2
mosquitto_pub -h 192.168.XX.X -t cmnd/sonoff/POWER -m on
mosquitto_pub -h 192.168.XX.X -t cmnd/sonoff/POWER2 -m on
Now because I have the relay in inching mode (PulseTime 10 = 1 second of relay activation) the commands above are all you need. If you set PulseTime 0 then the relay will stay on or off only as you manually toggle it. In that case you’d need an MQTT command that says “off” at the end instead of on.
If you use MQTT as I do you don’t need the http address and you don’t care about the extra Toggle 3 and 4 buttons that don’t work. I tried messing around with the GPIO pin assignments using a generic Sonoff (18) and I couldn’t quite crack the code.
Now lets talk about the hardware. There is a line on the board where just the power hook ups are and on that line it says “AC/DC 7-32 V”. So that makes me think I can plug 7-32 volts up to either connector and have a blast.
NOT SO. The capacitor on the Micro USB side is a TEN VOLT CAPACITOR. If you were to plug your USB connector into say a 12 volt power brick……….KABOOM! I found an old Sonoff basic I screwed up royally which has a 470 micro farad 16 volt capacitor on it and I changed mine as I would like to power my relay from a 12 volt Micro USB brick.
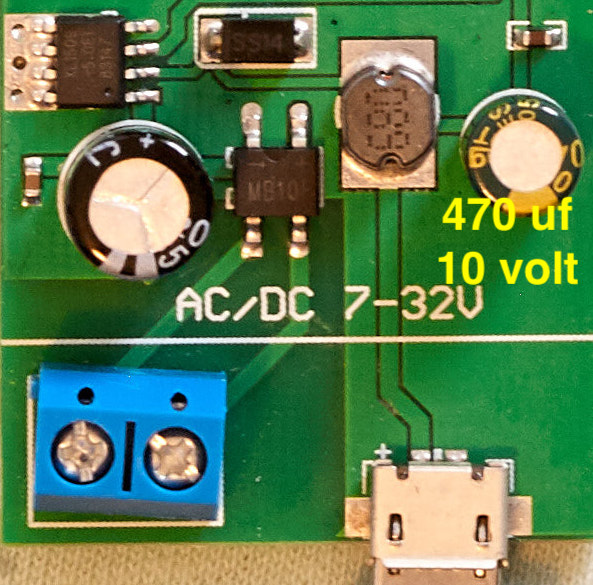
So basically if you use more than 10 volts to power this relay you have to do one of the following:
- Use the blue connector on the left. if you are coming from a USB brick you have to cut the microUSB connector off and plug the bare wires into the blue compression connector. The capacitor on that connector is rated at 33 volts. (Hence the maximum rating of 32v as stamped on the board).
- OR replace the 10v capacitor on the microUSB side with a higher rated cap. Be sure to use a 470 micro farad cap though. Again a junk Sonoff basic has one on the board.
Now lets talk about firmware shall we? The version on Github 6.4.1 isn’t actually the latest. I found this out because I saw some discussion about making a template for unknown devices and uploading them to the Wiki. Try as I might I couldn’t find the template button. Then I read where it was in 6.4.1.17 and I knew there was later firmware out there.
Go to this page and download under the 1M size area sonoff-minimal.bin and sonoff.bin
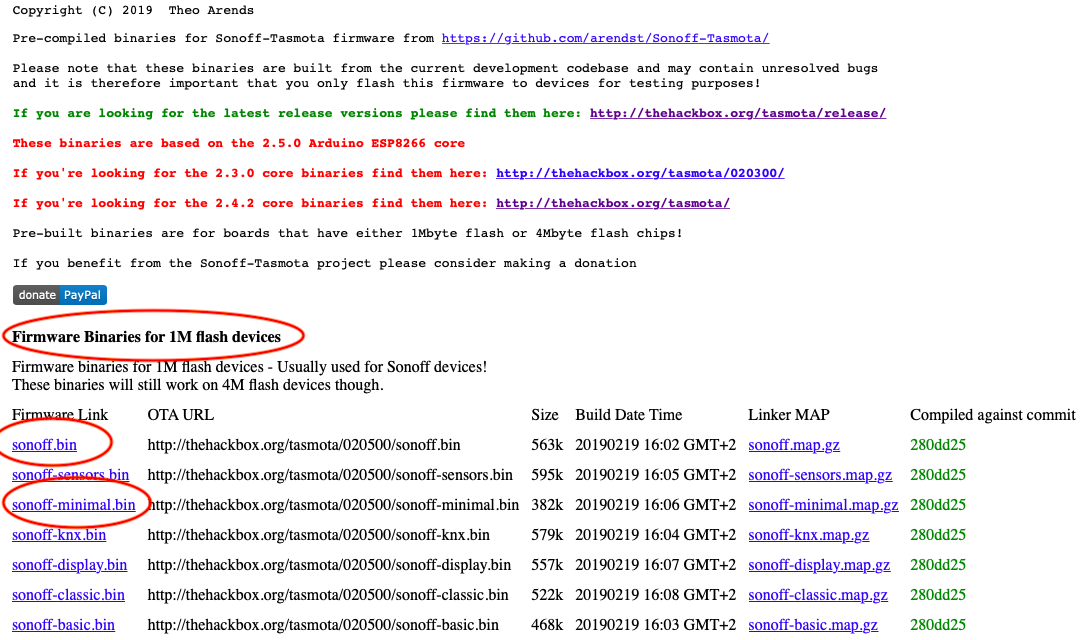
Now on your main menu click on “Firmware Upgrade”
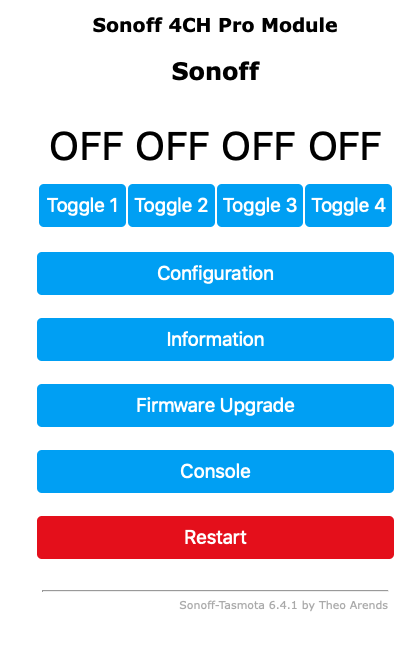
Upload the Sonoff-minimal.bin file FIRST. There is not enough space left in flash to write the sonoff.bin firmware file. Once minimal is installed THEN you can install sonoff.bin. Once it is done you will notice that under Configuration you will see a “Configure Template” button. NOW you have the latest firmware.
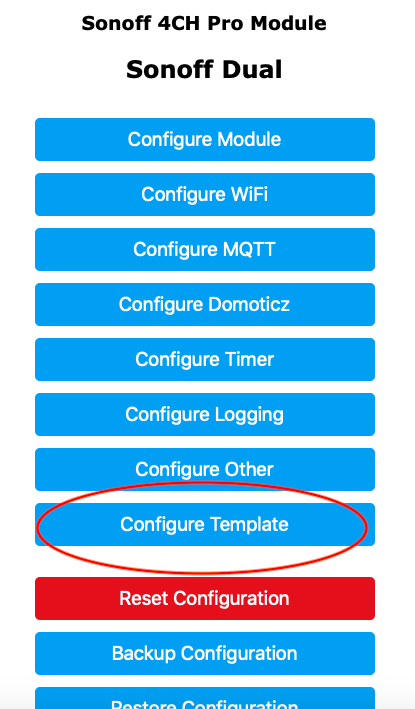
We just took a good hunk of hardware with shitty firmware and a shittier software app and made it a POWERHOUSE. Happy Automating folks.

Thank you so much for posting this. This is great!!
Exactly what I was looking for. I picked the same relay up to play with. I was unsure if the headers had TX/RX, I guess not. Thanks for sharing. I am now wish I had just gone with a Shelly or Sonoff.
The version of this shipping from Amazon now is slightly different. The 4pin header location is no longer present. VCC and GND can be located on the 7 pin header that is still present, though.
i got this same board from the same seller at amazon. i had to hold down the button closest to the relays (prior to power up) just like the tutorial said to get into programming mode. but that was not enough. i had to keep holding it down or it would not program. this means you can’t do it with 2 hands. i ended up soldering tx and rx which was very difficult. but you could do it with a 3rd person.
Hi John, thanks for this article. Your efforts here helped me realize this relay can do alot more meaningful work… From this, I realized the USB connector with 12v is not only a over voltage problem, but a usage burden on me wiring up this same relay into a little box to work in my truck F150. In a vehicle, am using this relay to switch on a bigger 40 amp relay.
To save space, I replaced the 10v capacitor on the microUSB side with a 25v 470 micro farad cap. Cut the end off a microUSB and soldered the little wires onto the one 12vdc in connectors.
Hence, it still works great at 12v now. Simply only have to feed one voltage source now instead of 2. If you are interested in a dialogue about developing this board further, then sidebar with me on the e-mail above.
Thanks again. I see from your other articles, you are a maker… like me.
Please disregard my last about feeding the USB with 12v. I cannot recommend feeding this board any voltage above 10vdc. Because the relays get too hot. I burned up both relays… feeding it 12v via the USB port. Even after replacing the 10v 470 microfarad capacitor with another 470 at 25v. Worked for about 30 minutes before I observed the relays were getting really hot. I only can recommend at this point is to use this board with only a 5v feeding the USB interface to let these relays switch separate bigger relays.
Hello
Thank you for your guide.
I have installed tasmota and all work…but there is only a problem..when for some reason it reboot automatically the relay turn on for 1 second and after turn off.
I have used it for my garage door…so every time it reboot my garage door is open.
Do you know if is possible fix it?
I can approve, that John’s method works. This module is an ST-DC2 listed here: https://templates.blakadder.com/eachen_ST-DC2.html made by Eachen.
I do also confirm that a longer holding of the button near the relais while powering on enters programming mode.
Direct flashing of Tasmota Full Version 9.1.0 was successful.
Profile 23 matches – i did not try another. Inching mode also works as described by Johns tutorial.
Excellent work – this is a bargain for your garage doors or gate controllers.
In addition to my post: Profile SONOFF DUAL R2 (Profile 39) machtes this PCB perfectly.
Here it is, 2 years later and I just bought that exact board off Amazon. The OTA update failed, but found your post. Although the instructions are dated, the chip is unchanged; however, I was able to get the Tazmotizer program to flash using an Arduino UNO I had laying around as the FTDI, holding jumpers for RX/TX to the pins you described. I used the tasmota.bin (generic firmware) and chose the “Sonoff T1 2CH (29)” that works perfectly. Thanks for the post! Couldn’t have done it without this info.
This was super helpful, thanks a bunch!
Great page, but you should correct the upper picture showing rx/tx-pins. The layouts are mirrored, so the numbers are 21 and 22, not 4 and 3 as the picture is showing! The lower picture showing the module is right.