
What’s a Spyserver? And why would you want one? Spyserver is a program for a Software Defined Radio (SDR) that allows you to access that radio from anywhere. It also allows you to share your radio from anywhere and you can likewise share other people’s SDR radios. Why would you want to do that?
First when the word “radio” comes to mind we tend to think of AM or FM radio only. An SDR device is so much more than that. It can literally listen to things from 0 kHz to 2 GHz or so. That’s EVERYTHING that you can think of that uses a radio signal. Short Wave, CB, Ham, pagers (yep they still use pagers), Police, Fire, EMS, the Space Shuttle flying overhead (not kidding), the tire pressure monitor sensors on your car, tracking aircraft, tracking ships, tracking weather balloons…………the list is almost endless.
Maybe local radio has a program you love that isn’t streamed. Maybe you’re a police scanner junkie and love listening to your local PD even when you are on travel. Maybe you want to listen to your NOAA weather channel before you begin that Holiday trip back home.
To simplify things though……you can listen to whatever you listen to at home from anywhere.
There are a couple different ways to set this up. One way is to set up a program called rtl_tcp or of course, Spyserver. Spyserver was originally made for AirSpy SDR radios initially although now you can use generic RTL-SDR devices now.
Setting Spyserver up on Windows is a breeze. Follow the directions here. Setting it up on a Raspberry Pi may be the best way to go so you don’t tie up a whole computer. Good directions for setting it up are on the page I just linked and also here are great directions. Once you get it running on the Pi it will look like this (also don’t forget to plug your SDR device into the Pi):
UPDATED: I didn’t want to amplify on installation procedures because, hey, I didn’t figure out how to do this, I’m just some guy who copied doing it. Since then I have done a reinstallation and noticed a few things were left out of the installation procedures that are necessary.
First off you need these dependencies in addition to the installation links above:
sudo apt-get install airspy libairspy0 libairspy-dev rtl-sdr librtlsdr-dev
During configuration of the file spyserver.config you need to make sure you add the serial number of the Airspy device.
sudo nano spyserver.config
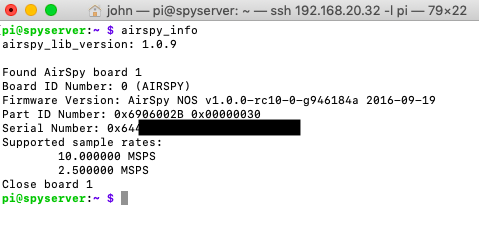
To get the serial number type:
airspy_info
Here is what that looks like:
Now lets look at spyserver.config. IT SHOULD BE NOTED THAT MY SPYSERVER.CONFIG IS SET FOR HF LISTENING BELOW 25 MHz. ALSO I HAVE BIAS T ENABLED WHICH POWERS THE SPYVERTER UPCONVERTER. DISABLE BIAS T (0) IF YOU ARE DOING FM OR VHF OR UHF LISTENING WITH NO SPYVERTER. BIAS T WILL SEND ABOUT 5 VOLTS DC DOWNSTREAM. THAT’S ONLY GOOD IF YOU NEED IT. NOT GOOD IF YOU DON’T.
# SPY Server Configuration File # TCP Listener # bind_host = 0.0.0.0 bind_port = 5555-6666 # List Server in Airspy Directory # list_in_directory = 1 # Owner Name # For example: John Doe L8ZEE owner_name = John E. Hagensieker # Owner email # For example: owner_email = # Antenna # For example: Random Wire/Magnetic Loop/Mini-Whip/Inverted V/etc. antenna_type = dipole # Antenna Location # For example: 48.858332, 2.294560 antenna_location = 35.1085, 77.0441 # General Description # general_description = # User sessions # maximum_clients = 1 # Maximum session duration # In minutes. 0 for no limit # #maximum_session_duration = 30 # Allow clients to retune and change of gain of the device # allow_control = 1 # Device Type # Possible Values: # AirspyOne (R0, R2, Mini) # AirspyHF+ # RTL-SDR # Auto (Scans for the first available device) # device_type = AirspyOne # Device Serial Number as 64bit Hex # For example: 0xDD52D95C904534AD # A value of 0 will acquire the first available device. # device_serial = 0x64xxxxxxxxxxxxxxx # Device Sample Rate # Possible Values: # Airspy R0, R2 : 10000000 or 2500000 # Airspy Mini : 6000000 or 3000000 # Airspy HF+ : 768000 # RTL-SDR : 500000 to 3200000 # Comment to use the device's default # device_sample_rate = 2500000 # Force 8bit Compression Mode # The 8bit Compression mode has proven sufficiently good for most streaming use cases. # Use it to same some internet bandwidth. # force_8bit = 1 # Maximum Bandwidth # Limits the maximum IQ bandwidth the clients can set # Recommended value for WFM is 200000 # Recommended value for narrow band modes is 15000 # #maximum_bandwidth = 15000 # FFT Frames Per Second # fft_fps = 10 # FFT Bins # Bins = 2^fft_bin_bits # fft_bin_bits = 16 # Initial Center Frequency # initial_frequency = 14900000 # Minimum Tunable Frequency # Comment if using the device default # #minimum_frequency = 0 # Maximum Tunable Frequency # Comment if using the device default # #maximum_frequency = 35000000 # Frequency Correction in PPB # #frequency_correction_ppb = 0 # Initial Gain # #initial_gain = 5 # RTL-SDR Sampling mode # Quadrature = 0, # Direct Sampling I Branch = 1 # Direct Sampling Q Branch = 2 #rtl_sampling_mode = 2 # Converter Offset # Set to -120000000 to enable the SpyVerter offset converter_offset = -120000000 # Bias-Tee # For AirspyOne only - Useful for LNA's and SpyVerter enable_bias_tee = 1 # Buffer Size (in milliseconds) # buffer_size_ms = 50 # Buffer Count # buffer_count = 10
And here it is running. Start it by typing (in the spyverter directory where you installed it).
./spyverter spyverter.config

It is sitting waiting for a connection to be made. One of the limitations of Spyserver though is that you typically have to connect to it through a Windows program called SDR#. They have just recently come up with a branch of a Linux program called GQRX that has a Spyserver Client. You can read about it and download it from here. It isn’t very stable in my belief so just be aware you’re going to be tied to using a Windows client. SDR# is free, free, free. Heck, all this stuff is free.
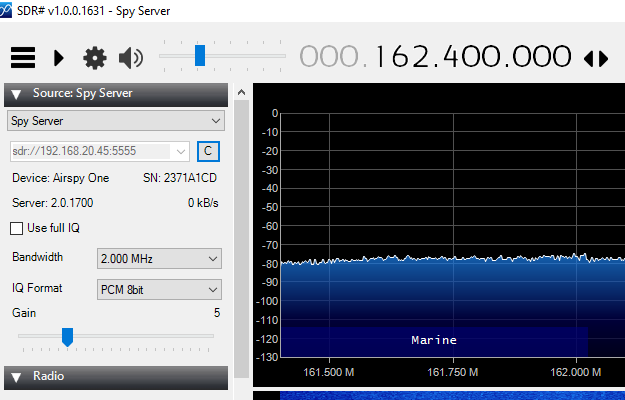
Here’s SDR# with the connection window showing I am connected to my Spyserver at 192.168.20.45 (local IP address).
Now here’s what the server end looks like:

Now you can tune in to any frequency from SDR# that the Airspy device can handle. I set my center frequency to 162.400 MHz which is the local NOAA Weather Radio Station. However just for fun I made a video of me connecting to my Spyserver from the special build of GQRX.
[kad_youtube url=”https://youtu.be/E3t2iKqnkE8″ ]
Works like a champ but again I think the GQRX client is kind of unstable. If you do experience instability make sure your Pi has an adequate power supply. Feed it at LEAST 2 Amps, more if you can. Don’t just plug it into a USB outlet with a crap cable or it will crash.
Now I can access this Spyserver from anywhere if I do one of two things.
- Access my local network via a VPN connection (preferred)
- Open and forward port 5555 on your router to your Raspberry Pi computer. This will allow you must then know your IP address and navigate to it by typing that address and port into SDR# or GQRX.
One thing they don’t tell you in the tutorials linked above it how to simply start the program at boot. Type the following in a terminal on the pi:
crontab -e
Now cut and paste in this:
@reboot /home/pi/spyserver/spyserver /home/pi/spyserver/spyserver.config
Now hit CTL +X key, then Y to save and reboot! It will now start at every boot.
Good luck or as they say in Japan……Gombatte!
Thank you so much for this post! This was exactly what I needed to get spyserver working without trouble on a Pi 3b+.