
Netgear MS108EUP Review
And Simple VLAN Setup
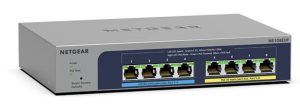
2.5GB Netgear MS108EUP Router
I just built a new firewall appliance that has four 2.5GB speed ports. I attached it to a Mikrotek hap ax³ router which also has a 2.5GB port on it. Then I added in a QNAP NAS which also has a 2.5GB port on it. To hook them all up together I needed a fast switch and I settled on the Netgear MS108EUP.
You can find hardware with 2.5GP ports on it pretty easy. But you know what is hard to find? A 2.5GB network switch that doesn’t cost an arm and a leg. Somehow or another hardware vendors are making devices with 2.5GB speeds. Sadly there really aren’t that many switches out there to support the speed.. They went right from 1GB to 10 GB and skipped right over the middle ground.
And while you might be able to find some $100 switches, finding one that is Managed (Smart) is quite a bit trickier. A managed switch is one that can do other tasks such as Virtual LAN’s (VLAN) among a lot of other tricks. A VLAN can be used to segregate certain aspects of a network such as the establishment of a Guest Network that can’t communicate with the primary network. Or keeping HR away from the Operations Department. You get the drift.
You Pay For Management
Considering this is just an 8 port Managed switch the cost seems a bit excessive at $249. I’m telling you though, there just isn’t much out there. I do want a managed switch because I do intend to run a VLAN. If you just want to hook boxes together, then opt for a cheap, dumb switch.
Firmware
I had to update the firmware on my switch. The only thing I’ll say about it is that it took quite a few minutes to complete and then a couple of minutes to reboot. Just be patient when you update the firmware. It takes a while.
Green Means Go
Green lights mean that it is negotiating speeds of 2.5GB. Yellow (amber) lights mean it is using 1GB speeds.
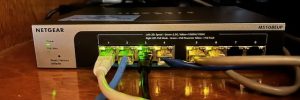
Router Lights
So in my case I’m working perfectly. My firewall, router, and NAS are all 3 lit up green as they should be.
Some slower network segments such as an ethernet cable to an upstairs switch (CAT 5 cable in my house), and a couple of Raspberry Pi’s explain the yellow lights. No way for me to install CAT 5E or CAT 6 cable in this house without knocking big holes into things.
Port 7 is empty and Port 8 is configured for a VLAN for a soon to be installed separate network range.
PoE
Power Over Ethernet. All eight ports on the switch are PoE. The first 4 are 60 watt ports each, and the last 4 are 30 watt ports each. That sounds cool but the specs list 230 watts as the total PoE budget. Depending on your devices that means you may not be able to necessarily use all 8 ports to power your stuff. I’m not using PoE on this switch so I can’t speak to it too much. I will say that at $249 it should do more than just be a camera hub.
VLAN’s Are Cool
One cool thing about VLAN’s is that you can put stuff on them and keep them away from other network segments. A good example would be Security Cameras. They generally aren’t known for their network security though and anyone who cracks one can then bounce around in your network. Unless of course the network is segregated. VLAN’s examples:
- Cameras
- IoT devices such as Home Automation
- Tools – I have lasers and 3D printers that can be controlled via wifi or ethernet.
And I could make that list pretty long if I wanted to but you get the idea. Keep common things grouped together, yet away from your confidential home or business network.
VLAN Setup
This was a little bit of a head scratcher. I came from a TP-Link Switch and VLAN setup was fairly intuitive. This was not as intuitive, and the manual wasn’t a lot of help. The explanation is in there but some screenshots would have been so helpful.
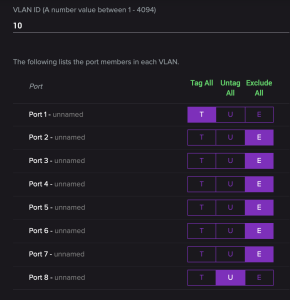
Here’s what I did. In this example I tagged port number 8 as VLAN 10
In the web interface go to Switching > VLAN and then activate Advanced 802.1Q VLAN
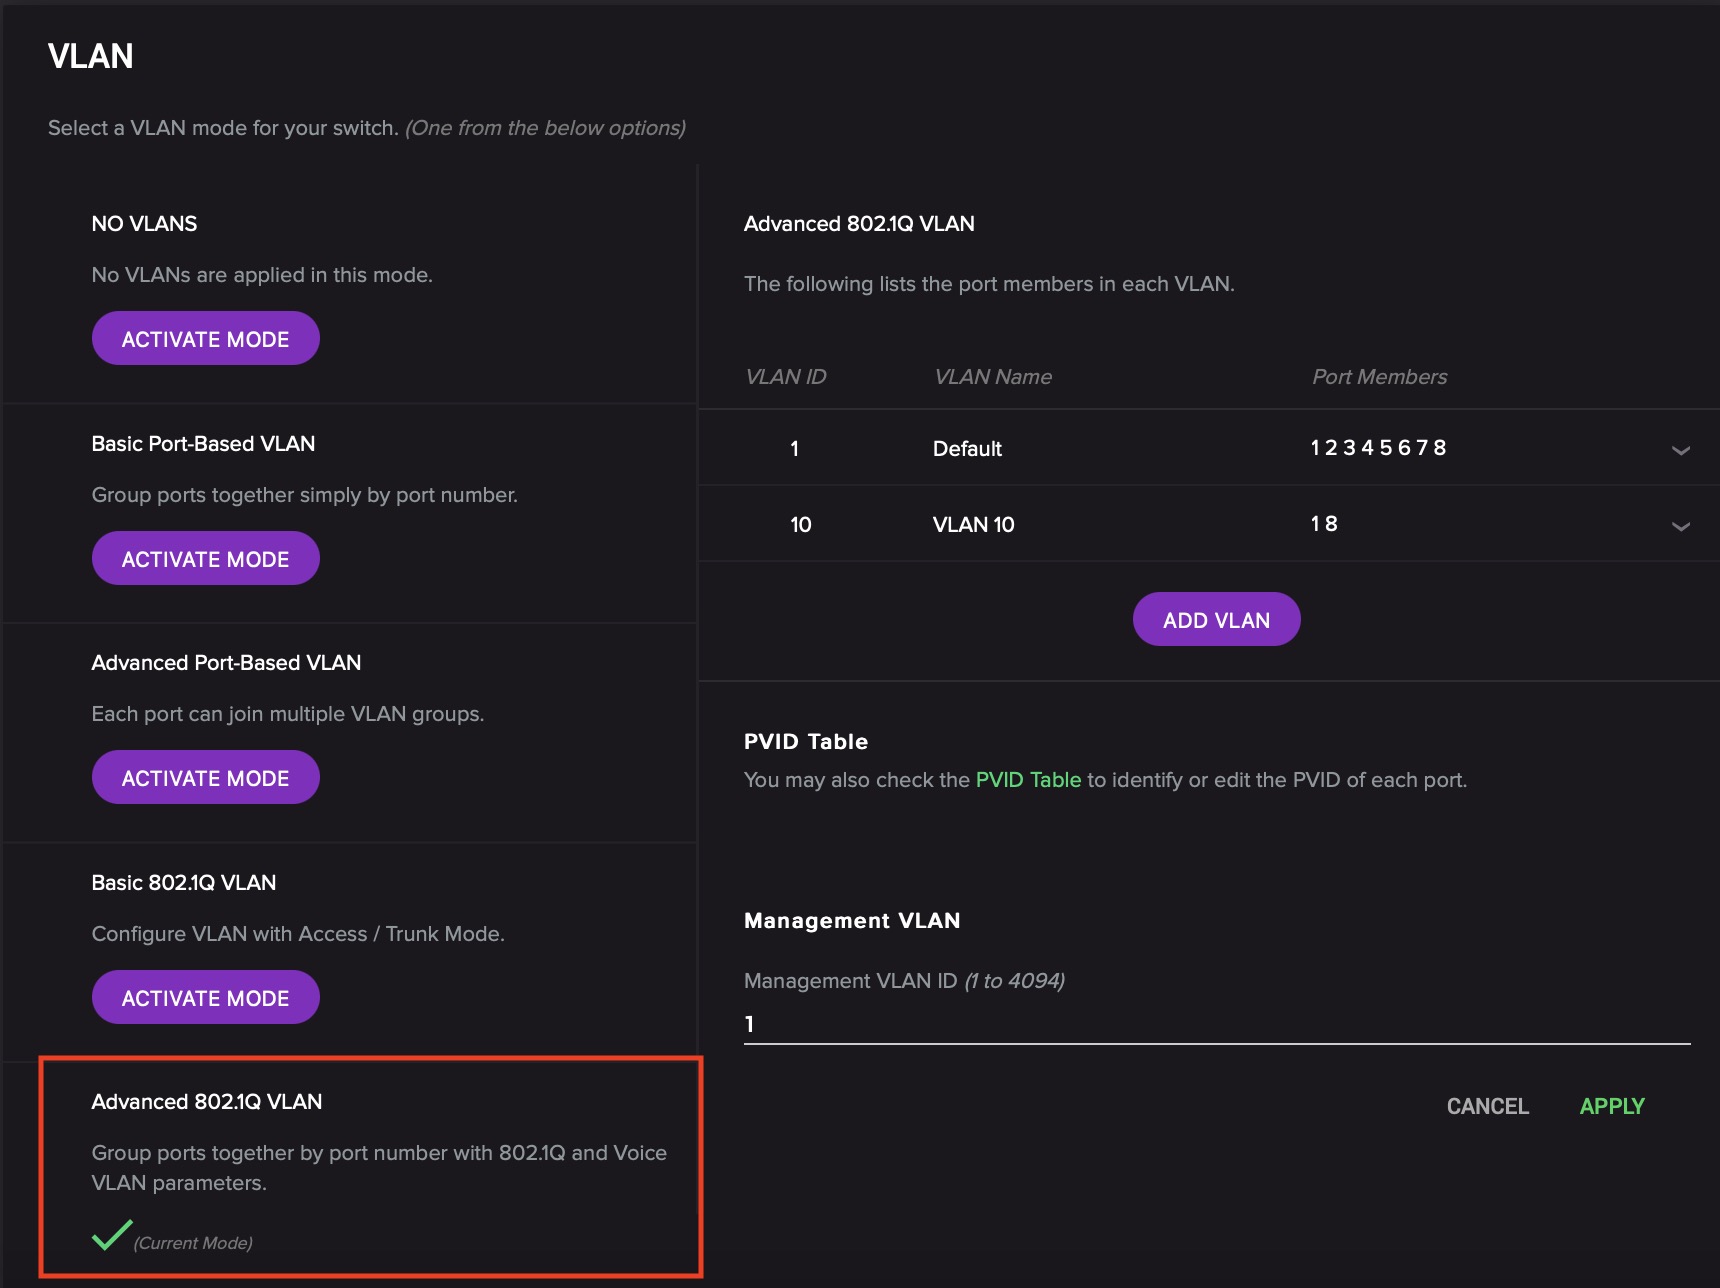
Activate VLAN
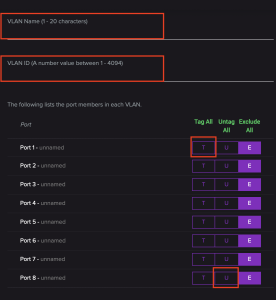
Once activated, go over to the right side of that page and click on “Add VLAN”. Give it a name (VLAN 10) and set the VLAN ID to 10. Then Tag Port 1, and Untag Port 8.
VLAN Setup
It will look like this (The VLAN name on the top got chopped off):
VLAN Setup
Click “Apply”. Now go back to the main VLAN page and look for a link that says “PVID Table”. You can see it in my first VLAN screenshot on the right just below mid-point on the page. Click on the port you made a VLAN (in this example, port 8)
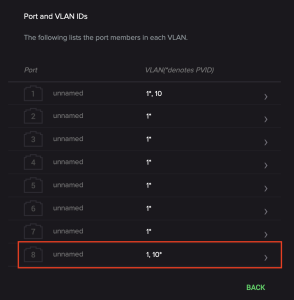
PVID Table
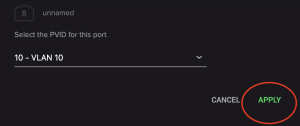
Finally make sure and set port 8 to VLAN 10. Then hit apply.
PVID Table
This is pretty much the way you’d set it up on my old TP Link router but the PVID stuff was buried in my opinion. So yes, you can set up a VLAN port but no, it isn’t very intuitive. Again, some screenshots in the manual would help.
I have a VLAN 10 tag set up on my OPNsense firewall which pushes a DHCP address range in the 192.168.10.0/24 range. Now anything I plug into port 8 is now on VLAN 10 will pull a 192.168.10.xxx address. I tested it by plugging in a Windows laptop which pulled a 192.168.10.2 address. Cool!
Summary
It’s hard to find a decent 2.5GB switch. Even harder to find a Managed 2.5GB switch. When you do find one it is expensive.
For $250 I wish it had a couple more ports. One thing I didn’t mention above is the power brick that comes with it is HUGE, but remember……it is a PoE switch which means it needs to push 48 volts.
It supports 64 VLAN’s which actually isn’t a lot but way more than enough for a home network. VLAN setup is a little different than most switches I’ve played with and in my opinion isn’t terribly intuitive. But once you set a VLAN up, it is set up and you shouldn’t have to mess with it again.
My conclusion is that it is a good network switch. but too expensive for what it is. That being said, there just isn’t another managed 2.5GB switch out there that doesn’t cost the same or more that I can find.