I got the inspiration to build up this Raspberry Pi NAS with a Compute Module and SATA adapter from Jeff Geerling. His blog page is here (linked with permission). If you like Raspberry Pi even a little bit this guy pushes the Pi to the extreme. His computer, networking, and Linux skills are exceptional and his delivery is easy to understand. If you visit his blog click the YouTube icon on the right side of the page and visit his channel.
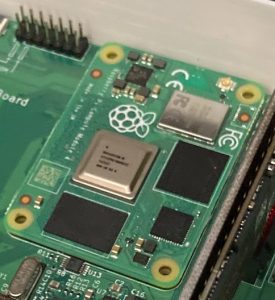
Decided to turn my Pi Compute Module 4 into Network Attached Storage (NAS). A real NAS. While a Raspberry Pi NAS won’t light the networking world on fire it is more than adequate to serve up files. I want to put this NAS out in my Shed for two reasons.
- Redundant backup in case the house burns down
- Use Squeezelite client to stream audio to my shed stereo, a circa 1980’s Technics Receiver.
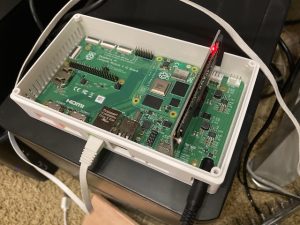
I have a mini-ITX case and guts to put a “real” server out there but my shed is a woodworking shop and push come to shove I’d rather gum up the fan and overheat $100 worth of Pi and Compute Module IO board than to blast a $450 server motherboard. Besides lots of sawdust it gets wicked hot and wicked cold in the shed too. This computer is going to get dirty and this is a choice of economics as much as anything.
Making a Pi NAS is easy but it also ends up being a spaghetti mess and unless you design and 3D print a custom case the Compute Module just isn’t organically designed to fit any standard case out there. We gotta get creative.
My cheap case is a Mini ITX case. How I dealt with the installation was to keep the 500 watt power supply intact and to 3D print a case for the Compute Module IO board. Then I just double side taped that to the inside of the enclosure. Here’s a quick video of the build with details to follow.
[kad_youtube url=”https://youtu.be/05rbTZZ4cXI” ]
Continue reading →