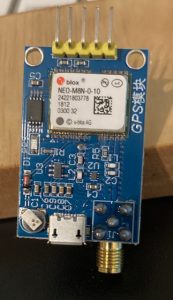
Geekpi CM4 Router Board – Challenges

I got my first Raspberry Compute Module 4 and installed it in a Geekpi CM4 Router Board.  And then cue the fun.  It is cool but it isn’t quite ready for plug and play prime time.   It was quite a challenge to get everything running.

First of all there are several images to download on the GitHub page and I just wasn’t sure which one to use.   The image that supposedly allowed the OLED display to work somehow or another didn’t have a working ETH1 wan port after installation.  A router without a wan port isn’t worth a shit and it sure isn’t a router.  Pardon my French.

So then the image with the ETH1 wan port working didn’t have a working OLED display.  FML.   In the great scheme of things the OLED being functional isn’t that important and that’s the direction I decided to go.  Then I figured out how to get the OLED on which is a hack.

Here’s how it happened:

Continue reading

Raspberry Pi Compute Module Discussion

I bought my 1st Raspberry Pi when the 1st version came out.  I think my intention was to make a streaming music server out of it, which I did using logitechmediaserver. Logitechmediaserver is a MUCH CHEAPER implementation of Sonos.  You’ve heard of Sonos, right?  Ever since them I have used the Raspberry Pi for all sorts of things.  Off the top of my head I can list:

  • Music Server
  • File Server with Samba
  • Temperature and Humidity Platform (with added sensors)
  • Hot Tub Hot Water Sensor and Alarm
  • 433 MHz Weather Station
  • Motion Cameras
  • NAS Server with OpenMediaVault
  • Dakboard (showing news feed, weather, calendar, etc)
  • Police Scanner with OP25
  • Streaming police scanner with IceCast
  • Home Assistant for Home Automation
  • Software Defined Radio Spyserver
  • PiAware for tracking aircraft
  • Satellite Tracking
  • 3D printer server with Octoprint
  • CNC G Code Sender
  • Kodi Media Server

I bet you that I’m missing a whole lot of stuff too.  That’s all I could think of quickly.  But that’s a lot. Raspberry Pi variants have served me well over the years, helped teach me Linux, and is still a workhorse around my house.

So why would you get a Raspberry Pi in a Compute Module footprint?  I’ll try to answer that.

Continue reading

Flashing Pi Compute Module 4 with eMMC memory from a Mac

I have been using the Raspberry Pi since it was 1st generation.  But I bought my very first Raspberry Pi Compute Module 4 along with a cheap Carrier Board  .  There are all manner of cool carrier boards.  Just there is one problem.  You can’t actually buy any of them.  Supply Chain issues and stuff.  LGB.

And that extends to the Pi Compute Module as well.  There are a bunch of them……..but you can’t get ’em.

About the only one you CAN get right now is the CM4102032 with 2GB of Memory.  Here is the data sheet for the CM4’s.

While it has an SD card slot (TF card slot, actually)………you can’t boot from it.  Well, that’s new.

The eMMC memory has to be written to directly.  Let me show you how.

Continue reading

Wood Working – I Surprise Myself

I may have written this in another blog or two but it bears repeating.  I have never really worked with wood in my life.  I have however used my laser on pre-made wood blanks from hobby stores and people close to me know I was doing this.

On Thanksgiving of 2021 my wife’s sister and her husband came over to the house and brought me a full sized Milwaukee router from a garage clean out from someone who had passed away.

The next day I took a rectangle of wood and put a routed edge on it and I think I probably giggled for 30 minutes.  I was tickled at how good it looked and how easy it was to do.

Since then I have bought several woodworking tools and a CNC machine.  I generally prefer to make things that are useful and not just trinkets and this blog will showcase a few of those projects.

Here’s thing number 1.  We renovated our bathroom upstairs.  My wife said she wanted some towel hooks on the back wall but said she wished it were on a board and not just the wall.  I decided to take a stab at it………………..
Continue reading

Super Old Tech – Fluorescent Lights

You’d think a modern Tech Blog would discuss modern equipment but the reality is sometimes tech that is still laying around gets forgotten about and in some sense this blog is about an attempt to upgrade some old tech.

Back when I was a pup fluorescent lighting was everywhere.  It was probably the most common way to light up larger spaces.  If you got your hands on a 4′ long lighting fixture you were living large.  My dad found a couple somewhere and painted them red, white, and blue and hung them in his office basement.  I’ll never forget that horrific buzz.

Recently my wife and I bought a mid 1980’s country home and the back yard shed had two 4′ long fluorescent light fixtures in it.  There were a couple of bad tubes in it and sometimes the lights would come on and sometimes they wouldn’t.  Being the tech savvy dude that I am I decided to upgrade the old light tubes to LED’s with drop in replacements.  Sounds easy, right?

It was not.
Continue reading

Some CNC Projects

I’ve been busy learning my new machine and more importantly the software, Vectric VCarve Desktop.  There are lots of choices for CNC software but Vectric Software is POWERFUL.   There just is SO MUCH you can do with it.   The last week or so I have been making Inlays.  That’s where you put, and glue one material inside another.  Here is what I have done so far:

CNC Inlays (click pics to enlarge)

[envira-gallery id=”4640″]

But wait, there’s more!
Continue reading

CNC Router Bits – My Take

I’ve recently began making things on a CNC machine.  Anyone can buy a CNC but the learning curve can be steep especially as it relates to bits.  There is SO MUCH to know.  What bit do you use for what type of cutting action, what speed, what feed?  What the same bit in different materials will do.  Screw up your cuts and you will snap a bit in a heartbeat.  Or you can dull a bit.  Even the right bit with the wrong settings can burn or tear at your substrate.

To further exacerbate the situation ……….. BITS ARE EXPENSIVE.  Snap a $40 bit and it hurts more than your pride.  Also, because of the high cost of bits, at least initially, you’ll probably only have one of each type of bit.  Snap that bit and you’ll have to wait a few days to get a new one.

I started this journey with a Sainsmart 3018 Prover machine.

Cutting with 1/8th bit

In this pic I used a 1/8th end mill to cut out my name in a semi-3D relief manner.

Took quite a while to make this small design.  To speed things up, many CNC operations require the use of multiple bits during a single design creation.

Cut, change bit, cut, change bit, etc.

I probably could have cut this out much quicker by using a larger bit to clear the big empty spaces and then coming in and cleaning up around the name.

That sure is easy for me to think about now but when I made that John sign I didn’t HAVE ANY BIGGER BITS.  My machine only came with engraving bits and then I went on line and bought a little bit set that really wasn’t money well spent.

Continue reading

Storm Preparedness. A Story of Failure

At my old house I had all manner of storm preparations in place.  We moved here in July of 2021  which gave me several months before the Winter Storm of January 2022 hit.

I, as they say………Screwed The Pooch.

Fortunately for me the power never went out because if it had I wasn’t quite ready for it.   My biggest indiscretion was that I own a 9500 watt, 50 amp generator.  That is essentially enough power to run your whole house in a storm.

At my old house I had a 7500 watt, 30 amp generator.  I ran my whole house EASILY with that.  And while this is a much larger house with mostly all electric appliances…………you pick a floor to live on.  Upstairs or Downstairs.  Actually the heating system downstairs runs on gas. So if we stay downstairs, which we mostly do anyway………….we’d never miss a beat.

So when we moved here I decided to hook a PBN50 Power Inlet Box up to the house.

  • 9500 watt, 50 amp generator – 
  • 50 amp power inlet connector – 
  • Cord to hook them together – X

Shit.
Continue reading

Acer Aspire 5 Mini Review

First let me say, “I AM A MAC GUY”.  We can also say that “I AM A LINUX GUY”.  I am most definitely NOT a Windows guy.  All this being said I am also a Maker, or we used to say in the old  days…….a Geek.

I have a lot of hobby type hardware such as Lasers, Vinyl sign machines, 3D printers, and CNC machines.  These things all have Mac or Linux software of some kind but the cream of the crop software is written for Windows.   While I can function on most of the hardware platforms with Mac, the straw that broke the camels back was my newly found love of CNC.   The best CNC software, hands down, comes from Vectric, and the new CNC machine I bought comes with Vectric VCarve Desktop.  The only computers I own with Windows on it are an old 3rd generation Intel i3 laptop with a tiny amount of RAM and a copy of Windows 10 on Parallels for Mac M1.  By the way, Parallels on a Mac M1 runs about as efficiently and trustworthy as the Government.  And it isn’t portable as I have it on a Mac Mini.  My CNC is in a back yard shed which is either too hot or too cold and I want to do all my prep and design work in the house and run out with the laptop just when it is time to set up the job on the machine.

A new Windows laptop was really my only choice here.  Here were my working parameters:

  • Cost –  Always the first consideration.  I only want to use this to run VCarve Software.
  • Availability – I wanted a computer I could run to the store and get and return if necessary.  Buying a computer by mail can be a horrible PITA if something goes wrong.
  • Upgradability – The laptop I chose can have RAM, and the M.2 SSD upgraded and it has an un-used place for a 2.5″ SSD SATA drive.
  • At least an Intel i5 chip
  • Upgradeable to Windows 11

I ended up buying an Acer Aspire 5 from Walmart, specifically the:

I hit all 5 of the wickets I listed above. Now lets go a little deeper.
Continue reading

Diamond Drag Bit Settings for Vectric

DISCLAIMER:  I’M NEW AT THE CNC RACKET. THESE SETTINGS WORKED PERFECTLY FOR ME AND ARE ESSENTIALLY MANUFACTURER RECOMMENDED NUMBERS. YOU SHOULD USE YOUR GOD GIVEN KNOWLEDGE AND YEARS OF EXPERIENCE AND TRIAL AND ERROR WHEN SETTING UP A DIAMOND DRAG BIT.  I DON’T PROFESS TO BE AN EXPERT AT THIS.  YET.

I recently bought an MC Etcher Diamond Drag bit from Carbide 3D .  I opted to get the 90° bit.  What a diamond drag bit does is to gently etch the surface by dragging across it and scratching the substrate.  The diamond bit uses compression (spring loaded) and does not spin during cutting operations.

Diamond Drag bit

This results in a very NARROW line that shows incredible detail especially compared to a rotating engraving bit which produces a much thicker cut line.

Where a laser may slightly burn the surface the drag bit scratch also produces a clean, white line that exposes all the detail or it can of course be used to fill in vectors or text.

One downside you’ll see when researching these bits is that they CAN wear out quickly, however I suspect that many wear out or the tip breaks due to improper settings or excessive pressure.

Here’s how I set mine up in Vectric VCarve Desktop.   First of all if you download the latest tool library there will already be a Diamond Drag bit listed in the Specialist category.  All we are going to do is to alter those settings.

Let’s get to it.

Continue reading