
Best Budget Laser For 2024 – ACMER P1 S Pro
ACMER P1 S Pro
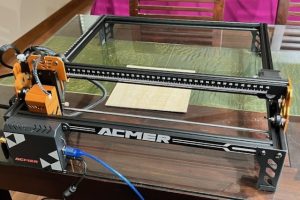
Desktop lasers entered the consumer market around 2019. At that time they were reasonably priced. This is kind of unusual as new Technology hitting the market usually has crazy prices. However, as laser engravers evolve they are getting more and more expensive. Finding a great machine at a budget price these days is tricky. The folks at ACMER Laser Engraver have provided me their ACMER P1 S Pro ($199) to review.
You heard me right. $199 on their website. It is also available on their Amazon store for $199. There are a variety of bundled laser kits as well which contain various options such as an air assist, honeycomb, machine enclosure, or Lightburn software.
Any time a desktop laser engraver pops up in the $200 or so range it excites me. And this laser really excites me. I have MANY desktop lasers that I have reviewed and believe me when I tell you that I can tell the good ones from the bad ones.
The ACMER P1 S Pro is a good one.
Stark Reality Of Lasers
Conversely, if you are a potential buyer of a desktop laser engraver you’ll see a ton of choices out there. Currently 30 and 40 watt laser machines are available and they sure look tempting to someone entering the hobby.
However, there is a stark reality to desktop lasers. Output power is achieved by combining several 5.5 watt blue diodes. The diodes function at around 445 nanometers. Two diodes combined gets you about 11 watts and are usually advertised as 10 watt machines. 4 diodes equals 20 watts roughly. And so on and so forth. As a result, the more laser diodes you combine, the larger the laser spot becomes. Let me wrap this up in a simple statement.
Lower powered lasers typically produce more detailed engraving results due to the smaller laser spot size.
This laser module spot size on this machine is 0.06mm.
Enter The ACMER P1 S Pro
I’ve reviewed a few budget desktop lasers. Many of them come without end stops or have frames that contain plastic or acrylic components. Almost none of them have any other connection method than USB. So I was surprised when I built this laser at how sturdy the frame was. To say it is rigid is an understatement.
Most budget lasers glide along the Y axis on 3 wheels per side. This machine use FOUR wheels per side which provides much greater stability. The mainboard has an ESP32 chip which allows you to control the machine via a downloadable app over Wifi. I have never seen that on a sub $200 machine before.
The machine has X and Y end stops included. Again, not many machines in this price range will have an end stop system. Getting below $200 means you have to make a lot of concessions. But I’m not seeing any corners cut here at all.
Heck even the frame extrusions have fancy racing stripes on them.
The key low cost driver I suppose is the 6 watt laser module. Six watts isthe sweet spot for engraving but doesn’t have a lot of cutting power.
Assembly
Assembly time is advertised at 25 minutes. It took me just over 45 minutes however, I am doing a review and I stopped and took some pictures and notes along the way. One really nice touch is that the process is broken into steps and the hardware is bagged accordingly. Awesome!
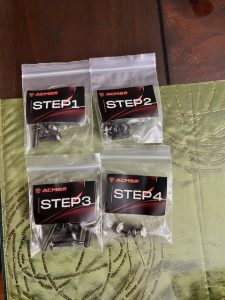
Included Hardware
All tools necessary for construction are provided, however, I used a set of long T handle allen wrenches which really makes things easy.
The only issue I encountered during construction was that one of the 4 Y motor screws (M3 x 6) stripped in the housing. I know I didn’t over tighten it. The tap in the motor must have been poor in that particular hole.
I managed to get an M3 x 8 screw to engage properly in that hole. Problem solved.
Frame
For a laser at this price point the frame is AMAZINGLY RIGID. Many budget machines will use plastic or acrylic or very thin metal plates on their X axis assemblies. Not here. There are some beefy 3mm thick aluminum plates on this machine.
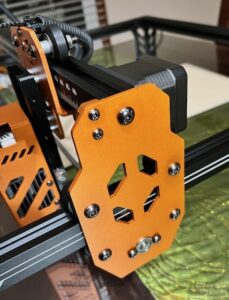
Mounting Plates
And again, the Y axis movement occurs on FOUR wheels mounted to that 3mm thick plate. This is the best frame stability I have ever seen on an entry level laser. Some entry level lasers sit LOW to the ground to achieve some stability.
The ACMER P1 S Pro doesn’t need to do that. This is one sturdy frame.
Documentation
The provided manual is pretty good, however downloading the manual and being able to view it and zoom in on it on a big screen is even better. The assembly steps stop abruptly with zip ties and the cable strip. I personally think it should then proceed to:
- Install TF card
- Plug in USB Cable
- Plug in Power Cable
I’ve built a dozen lasers but a brand new user hasn’t. Every laser forum in history has the question “What’s this SD card for?”. The info I listed above is actually sorta mentioned later in the manual during the LaserGRBL or Lightburn setup but it isn’t in a logical order. New users need that logical order.
Firmware Version
When connected to Lightburn the firmware version reports as:
[VER:1.1h.2023110901:]
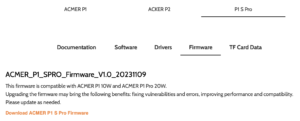
Firmware Version
The latest firmware update for the machine on the ACMER website is V1.0 with the same date of 2023110901. Even though mine reports as 1.1h I don’t believe they sent me a machine with a different or later firmware. 1.1h is the latest version number of the GRBL code which is common in almost every desktop laser out there.
Since the dates are the same I imagine they are both identical firmware versions. I could be wrong, but I don’t think I am.
Operation
I set mine up under Lightburn on a Mac. Device Settings are:
- Create Manually
- GRBL
- Serial/USB
- Name of Laser (ACMER on mine)
- X axis = 380mm
- Y axis = 370mm
- Laser Origin = Front Left
- Ensure Auto Home at start is set to OFF
I set up a very basic graphic with a rectangle and the word “ACMER” dropped inside the rectangle. Here is a video of my very first test burn. Ialways video my first burn on a new machine to capture whether it works, or whether it chokes. Mine worked perfectly!
[kad_youtube url=”https://youtu.be/EtONTjWxP1E?si=I3lxSa7Fa3yiuea2″ ]
Repositional Accuracy
Next up is a test for repositional accuracy. The goal here is to set the laser speed fairly fast. Then complete a burn with a few simple items and shapes. Then we home the machine and run a 2nd or even a 3rd pass. There should not be any line doubling or general fuzziness.
Let’s run a test.
[kad_youtube url=”https://youtu.be/w3lj5tREr9Y?si=HUvwnP9mDfma17RR” ]
You would be surprised how many lasers choke doing a 2nd pass. The ability to run a perfect 2nd or 3rd pass makes the difference between a successful project versus another hunk of wood in the scrap bin.
Suggested Improvements
First of all any upgrades are going to cost more money. And it seems like $200 or just less is the price point ACMER is aiming for here. But there are a few items that are on my wish list for improvement:.
- Better Cable Management – Actually they do use a sealing strip in the extrusion on the rear side of the X axis to hide much of the cabling to the far side motor. And they do have cable wraps. But cable management is usually minimal. Especially on entry level lasers.
- Better Connection To The Laser Head – The connector sits below the surface and is a bit tricky to remove and install. It must be done carefully to prevent damage to the JST connector and wires. To clean the laser head lens would require me to either cut the zip tie that secures the wiring to the laser or to remove the JST connector every time I need to clean the lens. Or I could turn the machine upside down I guess.
- Protective Lens Cover –There isn’t one. The lens is directly expoed and should not be removed. You must keep the lens clean at all times.
Let me explain the last bullet better. Some lasers have a lens inside the body of the module with a protective lens cap on the outside. The protective cap can be removed and replaced. The P1 S Pro has a brass retaining ring that sits flush and isn’t made to be removed by the user.
TRANSLATION: You must keep the lens CLEAN. If your lens fails you have to replace the entire laser module. I use 91% or higher Isopropyl Alcohol with a lint free lens cleaning cloth.
Lens Assembly
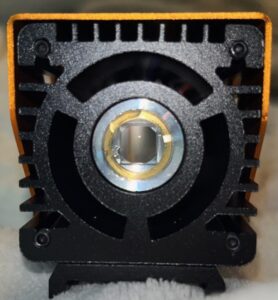
Lens Assembly Bottom View
You would need a special spanner type wrench to remove the brass retaining ring without damaging the lens surface. Or possibly use some type of rubber tipped screwdriver.
At any rate, you shouldn’t be removing this at all.
You may see some anomalies just to the inside of the brass retaining ring. This appears to be excessive sealant used when assembling the laser head assembly. As long as it doesn’t intrude into the center portion of the lens it is not an issue. More and more this looks like it definitely is not meant to be disassembled by the end user. No spare lens parts are available for purchase.
If you don’t keep the lens clean, and it fails, you’ll have to buy a new laser head. The link for purchasing a new 6 watt laser head is here.
Spare Parts Availability
I usually reserve this concern for higher dollar machines. I’ll say this again. If you buy a laser to run a business you need either a backup machine, spare parts, or both. Owning a machine that costs $1000 or $2000 can be problematic if you can’t repair it outside of the warranty period.
If you are buying an ACMER P1 S Pro to run a laser side hustle you should probably buy TWO of them. You might think I’m nuts, but I’m not.
Things happen to lasers. Fires can happen. Even to machines that are working properly. Walking away from a laser operation after poor material selection, excessive power percentages, and slow speeds will make you a nice warm and toasty fire. It doesn’t take a lot of flame to crack a lens, melt a belt, burn a switch, etc.You must clean the lens. Frequently.
If you don’t clean your laser lens it will start heating up the contaminants on the surface. Then they’ll discolor. And then they will cause the lens to crack. And that can happen quicker than you think.
Listen to me and buy two of these things. Or buy a spare laser head.
Engraving
The sign on my shed was getting pretty weathered so I shaped up a new piece of pine from the scrap pile and set up a fairly basic sign with text and a graphic. All operations in Lightburn were “Fill” with my speed set to 50 mm/s and 75% power.
Pine burns funny and you can see the grain in the engraving. Pro Tip: To minimize this you can defocus the laser to make the laser beam fatter.
Regarding the video my camera positioning wasn’t great but through the magic of editing I tried to minimize the pain somewhat. The end result of my sign was good output. By the time I hit the sign with some stain and clear coat it will look amazing.
[kad_youtube url=”https://youtu.be/77XR9kXoJaM?si=kMncxIP18iW6gdrQ” ]
Cutting
I did cut some 3mm birch which the P1 S Pro handled quite well. Let’s be honest though, 6 watt lasers are referred to as laser engravers. Not laser cutters. The claim ACMER makes is 4mm thick wood in one pass. I believe them based on my 3mm cuts.
If your goal with a desktop laser is to cut materials, especially thicker stuff, you need to level up bro.
Should You Buy One?
At $199 I’d say you be crazy NOT TO BUY ONE. Or two, for that matter. This quite simply is the best budget laser out there and has more features than any other budget laser I have blogged about previously.
Buy this laser if:
- You are a first time desktop laser user
- You own a much more expensive machine and you need an emergency backup engraver.
- Inexpensive enough to buy as a gift for your favorite Crafter or Maker.
If you wish to level up and not be at entry level, check out the ACMER P2 33 Watt laser. I reviewed it here. It is a gem. I referred to it as the Best Laser Engraver for 2024.
John’s Tech Blog STRONGLY RECOMMENDS the ACMER P1 S Pro
Pingback: Best Budget Laser Engraver - John's Tech Blog
Pingback: ACMER P1 10 Watt Laser Review - John's Tech Blog
Pingback: ACMER P2 Laser Engraver Review - John's Tech Blog
Thank you for this information. I’m considering this as a gift for my husband. Can he engrave a hardwood, such as maple with this machine? I know nothing about engraving.
Absolutely you can engrave hard woods. Most of these desktop lasers are specifically for woodwork. He’ll love it.
I just bought this as my first engraver, based on finding your reviews. I found the setup a little tricky with the screws that hold the pulley lines. I also had to redo those as it was not explained where exactly to put those. I’m not an engineer but I can easily envision several easier ways to get those desired results
Hey John,
Was thinking about getting one of these to add to my hobby. Great review! Do you know if it can engrave rubber/silicon for rubber stamps?
Also, how well does it engrave/etch metals? Not looking for any form of a deep cut, just the usual ablative scoring you’d normally see on any stainless steel panel or one of those steel water bottles!
Thanks again,
Patrick
Rubber stamps = yes
Metals = can etch some metals with pre-treatment compounds but typically the answer is that diodes can’t do metals well. You need an expensive fiber laser for that.
Hi John,
Thank you for posting these reviews, they are very informative. I have a need to engrave plastic like the old Hermes machines, I will use them for electrical panels. I haven’t seen anyone review or mention in detail what engraving plastic entails, everyone engraves wood! Can you recommend this Acmer machine to engrave plastic?
Thank you,
John
I will start this out with I know very little about this but will this work on aluminum, stone and glass?
You can do some anodized aluminum which removes the coating. I laser river rock all the time but unsure what you mean by stone. And you can do glass if you pretreat the glass with paint or other coatings.
Pingback: Best Budget Laser Engraver For 2025 - John's Tech Blog