
ACMER P2 33 Watt Laser Engraver Review
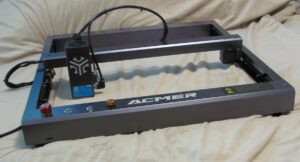
ACMER P2 33 Watt Laser Engraver
I recently reviewed the ACMER P1 S Pro and the ACMER P1 and now have been provided the ACMER P2 33 watt Laser Engraver ($799) to review. At no time has ACMER attempted to influence the content of my reviews. What you will read is exactly what I think.
I’d be remiss in not mentioning that ACMER is releasing their P3 IR and Diode Dual Laser soon!
ACMER P2 First Impressions
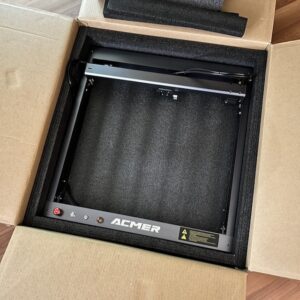
ACMER P2 Unboxing
I am not one to do an unboxing video. However, when I opened the box and removed the packing material from the middle I was left staring at a laser engraver that was PRE-ASSEMBLED.
The first desktop laser roughly hit the market in 2019. Since that time I have had lasers from at least 9 different manufacturers. Many of those have provided me more than one machine to test.
This is the first desktop diode laser I have come across that is PRE-ASSEMBLED.. There are some that are more assembled than others, however, this machine is essentially ready to go right out of the box. All that needs to be done is to hang the laser module and plug it in. Then connect the AC power and then connect the laser to your computer.
On the included TF card is a file named ACMER P2.lbdev (top right). They even provide a USB card reader to make this easy.
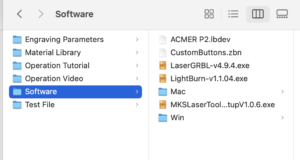
Lightburn File
Simply import this file into Lightburn to set up the machine settings. And you are ready to go. Additionally, even while taking notes, and screenshots and photos, I had this laser running in around 5 minutes.
ACMER P2 Features
A lot of desktop lasers these days have many features in common. So to get noticed these days in a competitive market you need to stand out somehow. As I mentioned previously the stand out feature here is that the laser is pre-assembled. Most lasers come with lots and lots of parts and very poor assembly manuals which can cause frustration.
I hate to re-list specifications. But I will mention the features here that I think are impressive to me.
- Pre-Assembled
- Good Manual
- TF card and USB card reader provided
- Lightburn setup file provided
- 33 watt laser module
- Built in laser focus bar
- Linear Guide Rails
- Two spare laser lens protectors provided (this is huge)
- Air Assist Pump provided 30L/min
- End stops
- Y switch for Rotary Operations
- JST Connector to attach rotary
- Emergency stop
- Key to disable laser power (I actually hate these but I 100% understand why they are necessary)
- Flame sensor buzzer (mine went off when outdoors in super hot, and direct sunlight)
Stability, Speed, And Accuracy
Because the ACMER P2 is pre-assembled you may miss the fact that the X and Y axis move along Linear Guide Rails. This is the first laser I know of that has this as a standard feature. Quite simply, having linear guide rails translates to improved accuracy.
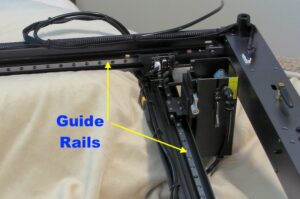
Linear Guide Rails
You will really notice this when engraving at high speeds and observing the quality of curves such as found in curved letters and numbers.
The advertised speed of the ACMER P2 is 30,000 mm/min. This could only be achieved by the addition of the linear guide rails. Most desktop lasers simply pull the X and Y axis by belts as they glide along an aluminum extrusion. The rails provide considerably more accuracy. Here is an example of a fairly high speed engraving. Notice how precise the curves are. If you look this close at some other lasers output you may notice jagged lines. This looks perfect!

Stability And Accuracy
Project Engraving
Here’s another example of the crisp and accurate rendering of the ACMER P2 Laser Engraver.

Actual Engraving
Rotary Switch And Connector
Most desktop lasers will have you unplug the Y motor and connect it to the rotary device. While this works, typically the connectors are small JST connectors which are not really designed for multiple insertion / removal cycles.
The ACMER P2 has a JST connector on the rear frame with a Y switch. In the Y position the laser functions normally as a desktop engraver. When in the R position it changes to Rotary Operations. You can leave your rotary plugged in at all times. This greatly reduces the possibility of damage to the JST connectors and laser wiring.
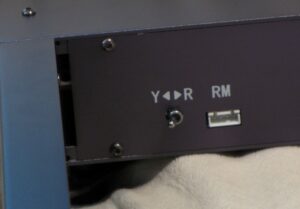
Rotary Selector Switch
Connectivity
The ACMER P2 can be controlled via USB with Lightburn, and LaserGRBL, and wirelessly using the ACMER app for Android or IOS.
Size Upgrade
An optional expansion kit can be purchased which increases the usable area from 420 x 400 mm to a whopping 420 x 800 mm. That’s huge! Especially from a sign making perspective.
Laser Module
The module is a Tr-5, 5mm focal length, 33 watt laser. As is common with blue diode lasers the wavelength is 450 nanometers.
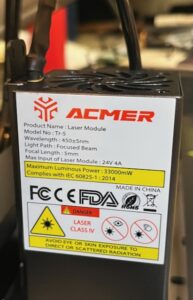
33 Watt Laser Module
Safety Features
The ACMER P2 is replete with safety features such as a Flame Detector, Tilt Gyroscope, Alarm Buzzer, Child Key Lock, Emergency Stop Button, and a protective eye shield.
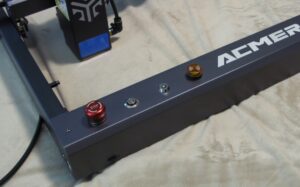
Safety Features
From Left to Right on the console: Emergency Stop, Power Button, Safety Lock, Alarm Buzzer. Upper left depicts the eye safety shield.
First Test
As with every laser I review I set up a simple text file and do a test burn. I film it with my iPhone and just upload the raw footage to YouTube. If I get a perfect first test you’ll see that. Conversely, If the laser head breaks the speed of sound and crashes into the rails and bursts into flames…….you will see that too. Here is my first test of the ACMER P2 33 Watt Laser Engraver.
[kad_youtube url=”https://youtu.be/OQe0ZBJ4YNM?si=DPgzxo47AR9QvtOv” ]
As you can see that first test went really well.
First Project
In the video below I engraved a serving board I made in my wood shop. And prior to the engraving I did a super quick familiarization.
[kad_youtube url=”https://youtu.be/K9oSSsLFLu8?si=mbZhB6HufXE1zqLZ” ]
The ACMER P2 did a sweet job on my serving board and I subsequently sold it in the same day!
R10 Laser Enclosure Box
ACMER also provided me their R10 Laser Enclosure Box. I’ve seen similar type enclosures and this one has the strongest frame I have seen. It also has a well fitting cover with an exhaust fan. There are a few things I would recommend for the next generation enclosure.
- The Exhaust Fan is powered by USB and an AC adapter is provided. It would be nice to have a fan connector utilized from the main board. Then it could be turned on and off via Macros in Lightburn.
- There is no internal light. An included light should also be able to be controlled via a Macro command in Lightburn.
- There should be a tiny opening on the left hand front edge for the air assist tubing and power cord to pass through to connect to the laser. I just had to leave a gap in the lower zipper
- It would be nice if a perfectly sized spoil board was provided. It is easy enough to make and add your own though.
[kad_youtube url=”https://youtu.be/uoL-L34xJ4g?si=XCaPbo0Wb9K9z3Y9″ ]
Engraving And Cutting
Engraving
I’ve already demonstrated in my videos above that the ACMER P2 33 Watt laser engraves really well. Typically, higher power lasers have larger laser dot size under optimum focus. That really translates to lower power lasers such as a 5 watt module or less can provide the best detail possible.
For a guy like me who makes signs, and applies my Makers Mark to wooden items, this really isn’t an issue for me. The laser dot size is advertised at a very respectable 0.08×0.1mm. It is ever so slightly rectangular but quite typical in higher powered lasers. Unless you are doing the most minute and intricate work this would never be an issue.
Cutting
For those of you who like the ability to cut thicker materials having a 33 watt laser module is a heck of a bonus. While technically you can cut with a low powered laser it usually takes many passes and produces lots of heat, smoke, and gooey residue. I managed to punch through 11 mm thick wood in likely two passes with minimal effort and nice clean edges with no charring realized.
[kad_youtube url=”https://youtu.be/-nDzAe7SGas” ]
Very impressive. It probably would have cut cleaner and faster had I done it on a piece of honeycomb.
Risers
The ACMER P2 frame has 4 legs and I recommend also getting a Riser Kit for rotary operations or for thicker items you may need to place below the module. It is probably just a matter of time before the 3D printer community designs some 3D printable riser system. Or you could just grab 4 cans of food from the pantry. Whatever works.
Should You Buy One
You should definitely buy the ACMER P2 if you want a laser engraver but the thought of assembling a laser kit scares you. The laser is accurate and powerful and produces repeatable results within a tight tolerance. The linear rail system is a truly innovative feature to be found in a desktop laser engraver.
The list of safety features is impressive, as well.
A 33 watt laser with an included air assist pump at the price of $799 is pretty impressive.
With so many laser manufacturers making similar type engravers one important thing to factor in is community support. ACMER has a good Facebook Page which is extremely helpful. Regarding spare parts I see that you can purchase replacement main boards and laser modules. The ability to purchase spare parts is HUGE. I strongly recommend at some point buying a spare main board at a minimum. It could make the difference between being able to continue to work or going out of business.
JOHN’S TECH BLOG HIGHLY RECOMMENDS THE ACMER P2 33 WATT LASER ENGRAVER
Pingback: Best Budget Laser For 2024 - ACMER P1 S Pro - John's Tech Blog
Pingback: Best Budget Laser Engraver - John's Tech Blog
Pingback: Best Budget Laser Engraver For 2025 - John's Tech Blog